Adding a Proposal to a Customer's Account
Solution No. 70
After obtaining the customer's information and obtaining measurements, the next step in the estimation process is to create a proposal. Nearly every customer wants to know how much they will have to pay for something, and in many cases the proposal is the last step in selling your company to the customer.
Creating a Proposal:
-
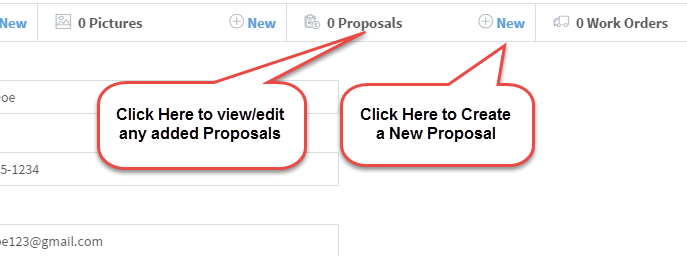
On SaaSphalt, click on the Customers for SaaSphalt tile. This screen will also be the default screen after creating a new customer.
-
Click on the name of the Customer you wish to edit. To make it easier, use the search function to find the customer. If brought here from the New Customer screen, the new customer’s name will be here by default.
-
Click on New in the Proposals tab at the top of the screen.
-
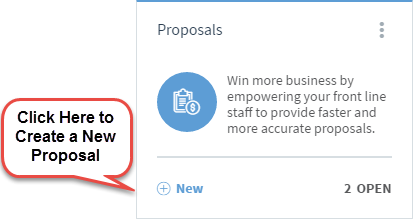
You can skip steps 1-3 by clicking New on the Proposals tile.
Clicking New in either step 3 or 4 will bring you to the New Proposal screen:
-
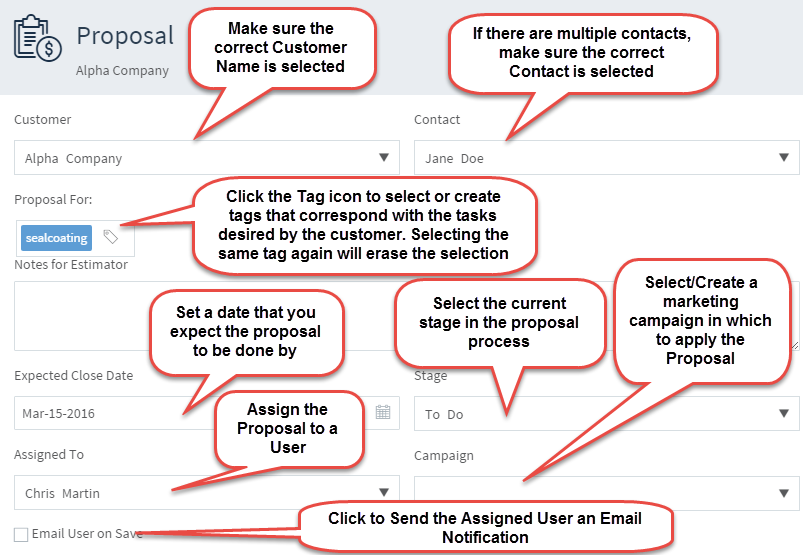
Choose/Ensure the correct customer is being used in the Customer drop-down box. To make it easier, use the search function to find the customer. A selected customer’s name will be here by default.
-
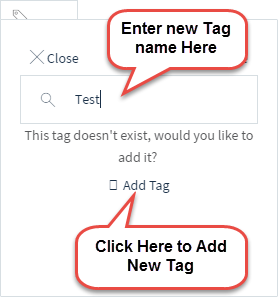
Click the Tag button in the Proposal For box to select any and all of the correct tags for the proposal.

A new tag can be created by typing a word into the text box and clicking Add Tag when prompted.
-
Choose the crew to assign the proposal to by using the Assigned To drop-down box. This will allow the specified user access to the proposal.
-
Choose the Expected Close Date either by manually inputting the date in the correct format or by selecting it using the Calendar tool to the right of the text box.
-
Choose the appropriate stage in the process from the Stage drop-down box.
-
Choose to either Save if done or Save and Edit to continue onto the Proposal Screen.
-
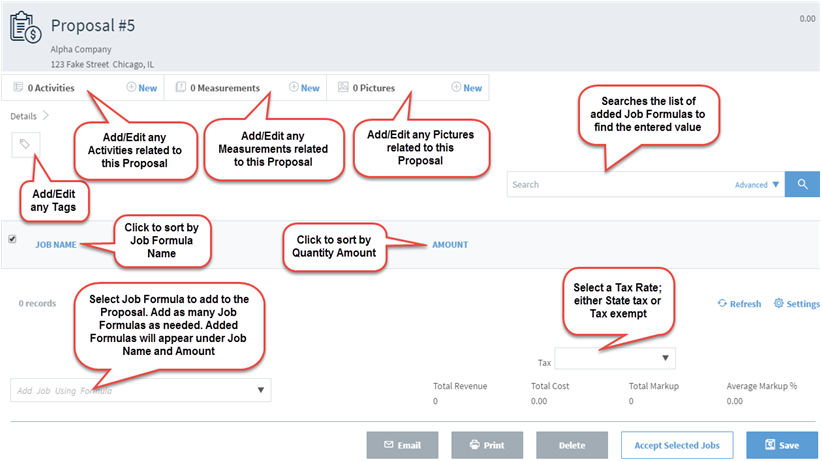
In the Proposal screen add a job using one of the Job Formulas by clicking on the Add Job Using Formula drop-down box.
-
Repeat step 11 for each job desired.
-
Select the correct tax formula to use by clicking on the Tax drop-down box.
-
Choose Print to print a copy of the invoice to be mailed/handed to the customer and/or Email to send a copy of the invoice to the customer's Email address. You can choose from any design templates by selecting the desired template from the Print Template drop-down box. These templates change the way each proposal looks and feels and are fully customizable. For more information about customizing templates, see Customizing Print Templates in the Customization section of the Help Center.
-
Click Save.
| Created by | Chris M. on | Feb-26-2016 |
| Last modified by | Matt R. on | Nov-13-2016 |