Adding Activities to a Customer's Account
Solution No. 71
Sometimes keeping track of where you are at with a customer’s account can be difficult. Perhaps it’s a matter of the left hand not knowing what the right is doing, in regards to multiple crews working on the same job. Maybe you’re simply waiting to hear back from a customer regarding their decision. Or, its possible you were out in the field when a customer called and your pen ran out of ink (we all have those days).
With SaaSphalt, you can kiss those days of disorganization goodbye, by using the Activities function. Activities help you keep track of where you are at in the process, by allowing a user to keep records of each interaction (or even attempted interactions) with the customer. It even allows the user to schedule interactions ahead of time and to schedule follow-ups for interactions that have already occurred.
Creating a New Activity:
-
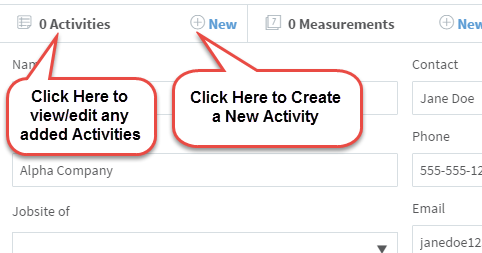
On SaaSphalt, click on the Customers for SaaSphalt tile. This screen will also be the default screen after creating a new customer
-
Click on the name of the customer you wish to edit. To make it easier, use the search function to find the customer. If brought here from the New Customer screen, the new customer’s name will be here by default.
-
Click New on the Activities tab at the top of the screen.
-
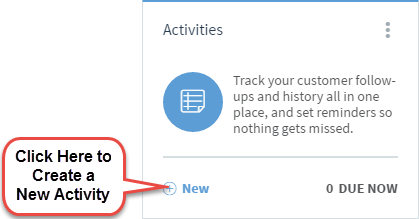
You can skip steps 1-3 by clicking New on the Activities tile.
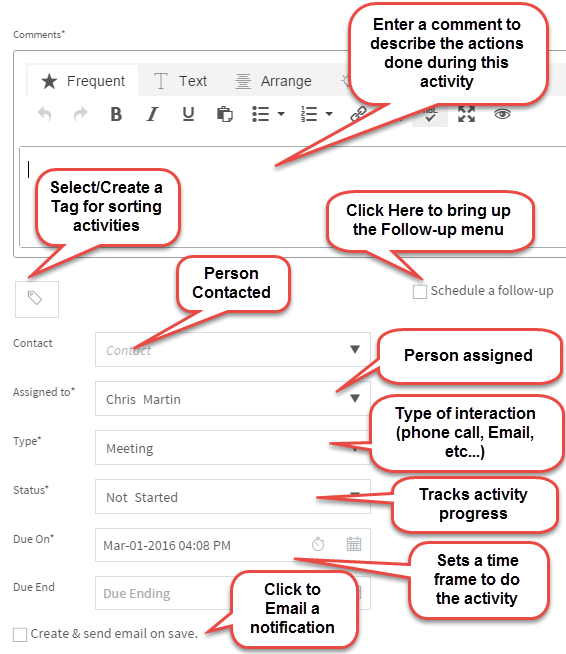
Sections marked with an asterisk (*) are required fields.
-
* Enter any comments or descriptions of the activity into the Comments text box. To allow for more detailed descriptions, this text box allows images and URL links to be inserted.
-
Select/Ensure the correct contact is selected in the Contact text box.
-
* Select a user in the Assigned to drop-down box. This will be the user who did the activity. The default assigned user is typically the one that corresponds with the SaaSphalt account currently being used.
-
* Select an activity type in the Type drop-down box. The activity types are based on the task being assigned to the user. To create a new activity type click New/Edit Activity Type. Example: if the user had met up with the contact to discuss something, Face to Face could be used for the activity type. If the user had called the contact to discuss something, Outgoing Phone Call would be a good activity type name. Like most things in SaaSphalt, use language that your team will understand. After all, they will be the ones using the service.
-
* Select the status of the activity. To create a new activity status click New/Edit Activity Status. These statuses will help keep track of where the user is in the activity. If the user has a meeting scheduled with a customer for tomorrow to see about a touch-up, Not Started would be appropriate. When they are on their way to meet the customer, they might change the status to In Progress. Once they are done they could mark it Completed if they are done or perhaps Deferred if the sealcoating crew had to go back and perform a touch-up (making sure to schedule a follow-up - see below for help scheduling follow-ups in Activities)
-
* Select a date/time that the assignment is going to/had occurred either by entering the date/time in the correct format or by using the clock and calendar icons in the Due On field.
-
Select a date/time that the assignment ends by entering the date/time in the correct format or by using the clock and calendar icons in the Due End field
-
To send an email about the activity (including the follow-up information) click on the check box next to Create & send email on save.
-
To link this activity to an existing case or an existing opportunity, click Additional Options.
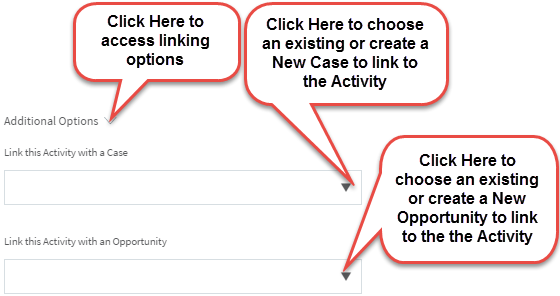
- To link this activity with an existing case, select the case from the Link this Activity with a Case drop-down list
- To link this activity with an existing opportunity, select the opportunity from the Link this Activity with an Opportunity drop-down list
-
If you want to schedule a follow-up see Scheduling a follow-up in the section below.
-
Click Save
Scheduling a follow-up:
Sometimes doing one activity prompts another activity. Maybe you called the customer, but they weren’t home. Perhaps when you called the customer, to set up a job, they wanted to add more work than you previously agreed and the estimator has to come out to give another estimate. What if the neighbor saw the amazing work you did on the driveway and the customer gave you their contact information, because they wanted theirs done too? Or you wish to contact the customer after a set amount of time just to check-in on your work (customer service IS important after all). The Activities tab allows you to schedule follow-ups directly from the already created activity.
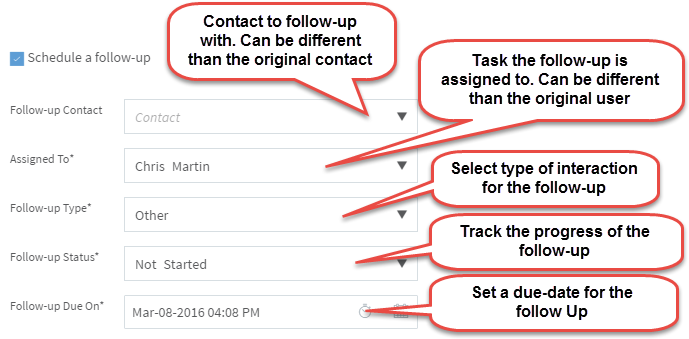
To Schedule a Follow-Up:
-
Click the check box next to Schedule a follow-up.
-
Sections marked with an asterisk (*) are required fields.
-
Select the follow-up contact from the Follow-up Contact drop-down list
-
* Select the user to assign the follow-up from the Assigned To drop-down list
-
* Select the type from the Follow-up Type drop-down list
-
* Change the status using the Follow-up Status drop-down list
-
* Set the due date by entering the date/time in the correct format or by using the clock and calendar icons in the Follow-up Due On field
| Created by | Chris M. on | Feb-26-2016 |
| Last modified by | Matt R. on | Nov-13-2016 |