Adding Measurements to a Customer's Account
Solution No. 68
Adding a Measurement:
After inputting the customer's information, the next step in the process is to estimate the job for which you were originally called. All estimation involves measuring something; whether it be total sq ft of asphalt to be sealcoated, the size of a patch, or even the number of parking spaces to be painted. SaaSphalt helps you keep all these measurements in one location,
-
Click on the Customers for SaaSphalt tile. This screen will also be the default screen after a new customer is entered.
-
Click on the name of the customer that you wish to edit. To make it easier, use the search function to find the customer. If brought here from the New Customer screen, the new customer’s name will be here by default.
-
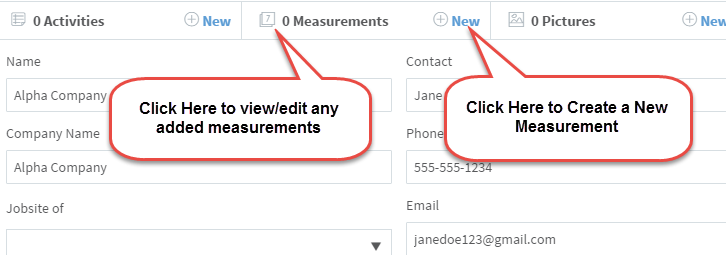
Click on the New button in the Measurements tab as shown below.
-
You can skip steps 1-3 by clicking New on the Measurements tile. Doing so will require you to find and select a name in step 5. Following steps 1-3 will enter the selected customer's name by default.

-
Ensure that the correct customer name is entered in the Customer drop-down box.
-
Select Measurement Type. This type works in conjunction with the Job Formulas. For example, if the Pavement type is selected, any job formulas that apply to Pavement (such as Sealcoating) will use this measurement when applied this customer.
-
Enter the Measurement Quantity


-
Add any Notes as necessary.
-
Click Save.
-
Create a new Measurement and follow steps 5-9 for each measurement type that is necessary.
- Click Save.
Using the Mapping Feature:
The Mapping Tool is another method of adding a measurement to a customer’s account. Instead of travelling to the job, manually taking a measurement, and then again manually entering the measurement in, you can skip all these steps and do them all from the comfort of your home or office.
To use the Mapping Tool you must first be on the New Measurement screen (see steps 1-5 above). Once there, to use the Mapping Tool:
-
Click Use Map.
-
Enter the correct Account, Username, and Password (the same information used to log into your SaaSphalt account)
-
Click Sign In.
You will then be brought to a satellite view of the address entered in for the customer you selected. From this view you can add or subtract a measurement, set a fill color for an already created measurement, or add a label to an already created measurement.


You can also adjust the viewing method using the controls in the bottom-right half of the screen. Using these controls you can: Rotate the screen clockwise 90 degrees, go to either a 2-D overhead view or a street-level view, or zoom in/out.

As of right now, the SaaSphalt Mapping tool can only add Measurements for items of the Pavement-type (Sealcoating, Asphalt, Overlays, etc...). We are currently working on implementing the Count-type items (Striping, Parking Blocks, etc), so look back for more details on that later!
To add a measurement to the total:
-
Click the Add to Measurement radio button.
-
Click the starting location using the shape-drawing tool.
-
Outline the section that you wish to measure.The shape-drawing tool only draws straight lines. For rounded areas, simply click in smaller intervals around the curve.
-
When you reach the starting position again, the section will be enclosed, the measurement added to the total, and the area will be filled by the default green color.

To subtract a measurement from the total:
-
Click the Subtract from Measurement radio button
-
Follow the same steps as adding a measurement. The subtracted area must be completely within an already added area.
Fill Colors and Labels:
Sometimes larger jobs have multiple sections that need to be done at different times/dates. Perhaps one section requires a specific tool, while other sections can be done using your default equipment. Fill colors can be used to differentiate between sections on the map and Labels can be used to help further explain details that might otherwise be described incorrectly or misunderstood.

To change a fill color:
-
Click on the Set Fill Color radio button
-
Click an area that has already been measured.
-
Each time you click, the area will be filled with a new color. There are currently 13 different colors/shades to choose from
To add a label:
-
Click on the Place a Label radio button
-
Enter a Label Text into the new textbox
-
Click any number of areas to place the label. Note: Labels can only be placed in an already measured area. The same label text will be used each time, until a different Label Text is entered.
Save the image in SaaSphalt:
Having access to the image used in measuring can be important. Perhaps the customer will want to have input as to which sections must be done first. Or maybe the work crew will need a copy of the image on their work order. Whatever the case may be, SaaSphalt allows you to save the image in the customer’s Pictures.
To save the image/measurement:
-
Mark the checkbox next to Save Picture
-
Enter a name for the image into the Name textbox.
- Click Save. ***Warning, this will also save the measurement and bring you back to the last SaaSphalt screen, so make sure you are completely done before clicking Save.***

New Mapping Feature: Count Measurements - Coming Soon!!!
| Created by | Chris M. on | Feb-25-2016 |
| Last modified by | Matt R. on | Nov-13-2016 |

