Scheduling an Accepted Proposal
Solution No. 50
After the proposal is accepted, the next step is to schedule the work to be done. Accepted proposals are sent to the Waiting List, where they can be assigned to a user (usually a specific crew or crew leader) as work orders and scheduled a date (or dates) to be completed.
-
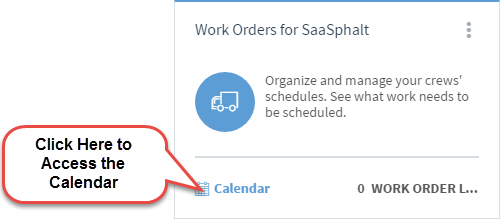
On SaaSphalt, click the Work Orders for SaaSphalt tile.
-
Click on Go To Calendar at the top of the screen.
-
You can skip steps 1 and 2 by clicking Calendar on the Work Orders for SaaSphalt tile.
-
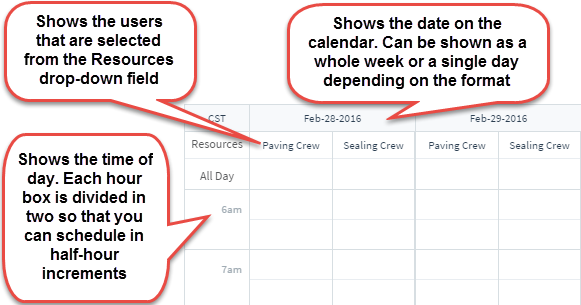
Select the user that you wish to assign a job to from the Resources drop-down box. See Setting Up Users for more information on how to create new users.
-
Repeat step 3 as necessary for each crew being assigned work. You will notice as you add more users, the boxes in the calendar become smaller. Be careful you do not add too many users to the calendar at once, or it might become too difficult to see. You can always remove a user from the calendar by clicking Remove next to that user’s name. Removing a user’s name from the calendar does not remove any of the work orders that have been assigned to that user, so add as many users as you feel comfortable working with at one time.

-
On the calendar that there is a date column and a time row, and in the intersecting boxes there is a line dividing the top and bottom. Each of these boxes indicates a date and time, and the halves of those boxes indicate half hour intervals of that period. These boxes are what you will use to easily assign work orders. and are shown below using the Paving Crew and Sealing Crew users.
-
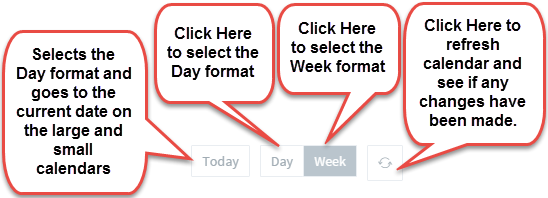
To assign a Work Order, find the starting date, time, and user that you want to assign the task, then click on the corresponding box. You can change the dates by using the small calendar on the left, the back and forward arrows next to the date(s), or the Today, Day, and Week tabs on the right.
-
Week is the default format. This allows you to see everything that is going on in the week you have selected. This is useful when trying to schedule a single user, because you can assign that user tasks and move them around to fit your plans. Selecting a date on the small calendar brings you to the week containing the date you selected. The back and forward arrows will move back and forward in one-week increments.
-
Selecting Day changes the calendar to a single day format. This is especially useful when assigning a daily task, especially to a large number of people. Selecting a date on the small calendar bring you to the specific day you selected. The back and forward arrows also change with the format and move back and forward in one-day increments.
-
Today follows the same format as Day and selecting it brings you to the current date. This is useful if you have been doing scheduling in advance or looking up work orders from the past and want to be brought back to the current day.
-
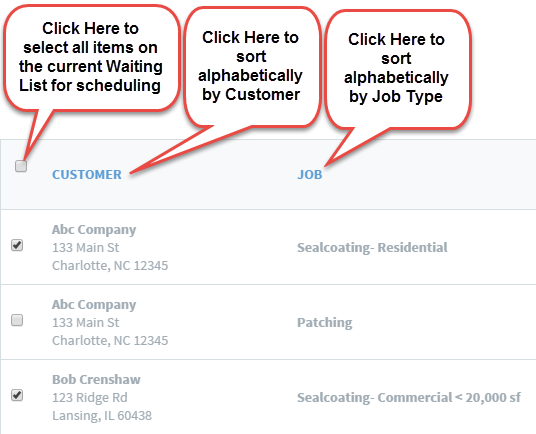
Click on the check box next to the customer/job that you want to schedule. You can click multiple jobs at once (or all the jobs by clicking the check box next to Customer).
Hint: If you are scheduling for specific crews or for a specific location, you can use the search box to find jobs that match your parameters; such as a city or job type. You can also click on the tabs, such as Customer and Job to sort the corresponding section alphabetically, or reverse alphabetically if you click on it a second time. Both the sort and the search functions coincide together, so you can find all those jobs in Chicago and then sort by Job type to group all the Sealcoating, Patching, or Crackfill jobs in Chicago together.
-
Click Schedule Selected. This will remove the selected entries from the waiting list, and put them on the work order list, under the date/time/crew member that you selected. As seen below, assigning multiple jobs to the same crew at the same time fills in the slots after the first.
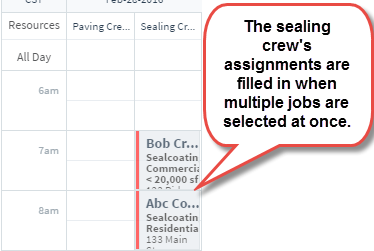
Assigning multiple Work Orders at a time will place those orders on the calendar in order, starting at the time you selected. You can also manipulate each individual Work Order directly from the calendar.
-
To move the item to another box, simply click and hold the item and move it. Placing it in another user's column will re-assign the item to that user.
-
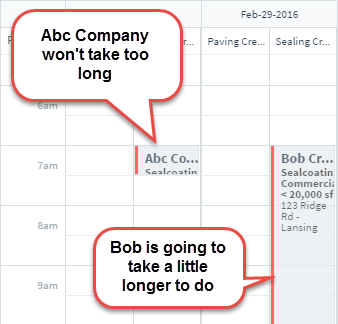
To adjust the size of the item (to cover more or less time) hover the mouse over the bottom edge of the item until the double-ended arrow appears. Click and hold to drag the box and cover the amount of space needed. It can be reduced to as little as 30 minutes and as large as the entire day.
-
To remove the work order from the Calendar and back to the waiting list, double-click on the specific item. This will bring you to the Edit Work Order screen. From here, you can adjust times and dates, select a crew to assign the work, and more. To actually remove the work order entirely, click the Status drop-down box, and select Waiting List from the choices. For more information see Editing a Work Order later in the Help Center.
| Created by | Chris M. on | Mar-07-2016 |
| Last modified by | Matt R. on | Nov-13-2016 |