Creating a Job Formula
Solution No. 66
Job formulas are the numbers behind the scenes that you create based on your own personal QuickBooks accounts. These formulas take information that you must only enter once to calculate the cost of any job of that type.
To create a new Job Formula:
-
Clicking on the Job Formulas tile will bring you to the following screen:

-
Click on New Job Formula. You can also skip steps 1 and 2 by clicking directly on New on the Job Formulas tile from the Dashboard

-
Enter the Formula Name (Internal).
-
Enter the Name for Proposal.
-
Select the Job Type from the drop-down box.
-
Input a Description for Proposal.
-
Click Save

-
The Edit Job Formula screen will appear. In this screen you can edit the information that you entered on creation and add formulas to help create your own personalized Job Formula.

-
To customize your Job Formula, click Add Formula Line(s). The Formula Line screen will appear. In this screen you create a single line of your formula based on a specific task that is involved in the formula. In the example shown below, we will be creating a formula line that calculates the labor rate for applying sealer to normal, non-porous asphalt (note: the numbers used are made up and even real numbers would be an approximate average most of the time).

Using this line (and the measurement information input for the specific customer) SaaSphalt will determine the rate that must be charged to the customer.
-
Select an Item from the drop-down menu. These items are based off the QuickBooks account and can include things such as labor, travel time, unloading/reloading, etc… This information dictates other parts of the formula, so make sure to choose the one that best describes what is needed. If the selected item does not have a Unit (such as "Man Hours", "Tons", or "Gallons"), you will be asked if you wish to add a unit to the item.
-
Clicking Yes will redirect you to the Item Unit screen, where you can add a unit of measurement to the Item.
-
Clicking No will allow you to continue without adding a unit to the item (it is recommended that you populate the Item Unit
-
Choose a Measurement Type from the Calculate Quantity Based On dropdown. You can add new/edit current measurement types by clicking Add / Edit Types in the dropdown. .
-
Choosing Fixed Quantity brings up the Qty text box which allows you to enter a specific number. This can be used for things such as allotted travel/preparation time, or even just a flat fee for a certain job that needs done.
-
Choosing any other created measurement types item will bring up the Production Rate text box for a service item or the Coverage Rate text box for an inventory item.
- Choose a name for the Work Order to help differentiate between similar jobs.
-
The Cost is automatically decided by the selection made in the Item menu. This cost comes directly from the synced QuickBooks account as the accumlative cost for the service/product. For example: Labor cost might include hourly wages, unemployment insurance, driving insurance, etc... Asphalt cost might include the price of asphalt, truck maintenance, propane costs, etc... This can be as inclusive as you want.
***Note*** You may choose to edit/change the cost for the item in this screen, but doing so will permanently change the cost for the item in your QuickBooks file. A prompt will occur asking you if you want to change the Item's cost.
- Clicking Yes will permanently change the item's cost regardless if you save/delete the Formula Line or not.
- Clicking No will revert the cost back to its original value.
-
Enter the Markup % to the desired amount in order to determine the amount of profit gained from each job line. This amount is usually based on calculations you have made to determine how much markup is necessary to make the item profitable.
-
The Rate is automatically calculated by multiplying the item's Cost by the entered Markup %.
-
If a created Measurement Type is selected, the formula will use the customer's information multiplied by the formula line's calculation to give the total rate for that item. For example: your estimator measured the customer's driveway to be 1200 sq ft. You've decided that your sealer has a coverage rate of 50 sq ft of pavement per gallon. Your QuickBooks account has given you the cost of $3.00 per gallon of sealer and you've decided on a 16.8% markup; giving you $3.50 per gallon of sealer as your going rate. Knowing it will take 24 gallons of sealer for 1200 sq ft of pavement, the Formula Line will then include $84.00 for the cost of the sealer.
-
If Fixed Quantity is selected, the rate will be multiplied by the quantity entered and that will become the total rate for that item. For example: you know that loading and unloading the necessary equipment for a job typically requires no more than 15 minutes, regardless of the size of the job or the number of people working. So, after selecting Labor, you set the quantity to 0.25 Man Hours. Quickbooks gives you the cost of $45.00 and you decide on a 0% markup, because the loading/unloading is almost always less than the 15 minutes you are charging anyway. The Formula Line will then include $11.25 for loading/unloading.
-
Click Save
-
Repeat steps 9-16 for each other Formula Line you wish to add. Note that each Formula Line item will likely have a different cost and mark up and
-
Click Save
A sample Job Formula is shown below for sealcoating residential driveways. In this formula the cost of the labor for applying the sealcoating, the sealer cost, and the labor for preparing the driveway are all added together to give you the total cost of the job (once applied to a customer).
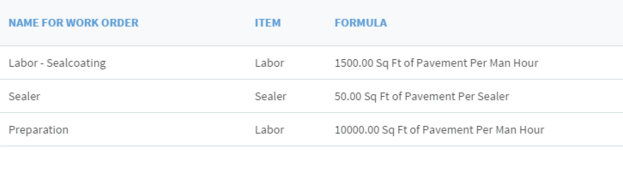
This example formula is saying that a crew can sealcoat 1500 sq ft of pavement per man hour, that 1 gallon of sealer can cover 50 sq ft of pavement, and that the crew can prep 10,000 sq ft of pavement per man hour.
You might create one formula for smaller driveways that is simply a flat cost, one similar to the one above for regular driveways, one for more porous driveways that accounts for the extra sealer/time, etc...; basically create one for every opportunity that exists (and when a new one arises, you'll be able to make one for that too). This is, after all, what SaaSphalt is all about: customizing your account so that it best suits your needs!
| Created by | Chris M. on | Feb-25-2016 |
| Last modified by | Chris M. on | Dec-13-2016 |