Activity calendar
Solution No. 292
OVERVIEW
Date
Assigned to
Status
Video tutorial
Overview
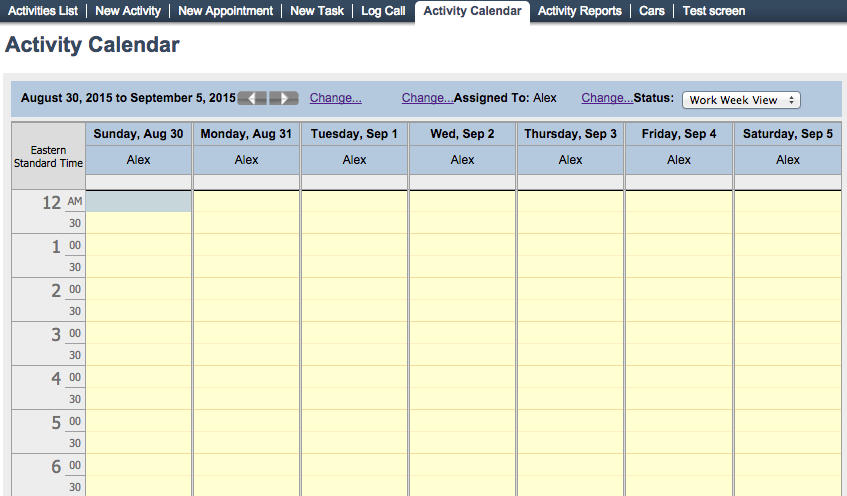
In the Activities tab, you'll find a tab link called the Activity Calendar. This calendar displays all of the past, current, and future activities you have created in Method. By default, the first thing you'll see is the current week displayed in half-hour increments for 24 hours a day, by day from Sunday to Saturday. It's called the Work Week View.
You will also see several options running across the top of the screen, including a number of links and a dropdown Filter view by list. Let's take a look at each of these in more detail.
back to top
Date
You can see the date displayed in full by month, day and year. Right next to that you will see two arrow buttons and a link marked "Change". As you might have guessed, clicking on the left arrow button will display the calendar week previous to the current, and clicking on the right arrow button will display the calendar week following the current. If you click the Change button, it will generate a full mini-calendar showing the entire month. From there, you can select a week to display from any month in the calendar year.
back to top
Assigned to
Currently you should see your own user name in the Assigned to field, but if you click on the Change button, you'll see the Assigned to grid. From here you can assign this calendar to Method users (which means activities assigned to them will appear). Let's take a closer look at this grid.
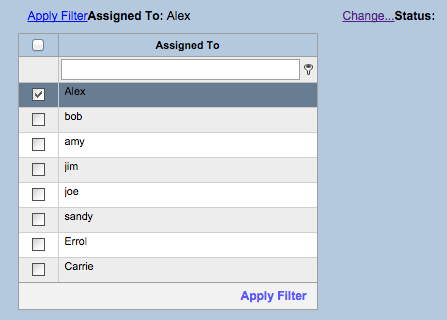
The clickable box on the top left hand corner allows you to select all users in the grid, which means the calendar will be assigned to everyone. You can type the name of a specific user in the Assigned to field in order to narrow the search. The tab icon to the right opens options to filter this list by narrowing the parameters of the search field (e.g . For more information on those options, click here.
Once you have selected the user(s) you would like to have displayed on the calendar, you can click on Apply filter to apply these parameters to your calendar. Applying this filter will display all activities assigned to each user you've selected in the calendar.
back to top
Status
Right next to the Assigned to grid, you can see another heading that reads Status. Remember when creating a new activity status you were given the option to assign a color to a custom status? This is where we will see the fruits of that labor.}|
In much the same way as the Assigned to grid operates, you can filter Status type by typing in the whole title, or parts of it, depending upon how you choose to filter the grid (see the previous section for a breakdown of those filtering options). Each status type is linked to a distinct color.
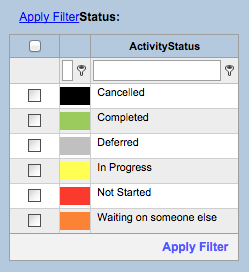
Once you have decided which status type(s) you'd like to see displayed in the calendar, you can click on Apply filter to put that into practice.
 |
You can apply multiple filters at once. For example, if you wanted to see all activities currently in progress assigned to users Alex, Errol and Carrie, you would simply:
- Select those three users from the Assigned To filter, then click Apply Filter, and
- Select "In Progress" from the Activity Status filter, then click Apply Filter.
Method would then display all In Progress activities assigned to those three users, all on the same calendar! |
Once the calendar is displayed in this way, you can select individual activities by double-clicking on them. This opens the Edit Activity screen for that activity, where you can add, edit, or remove information from the activity.
The calendar is a handy way to keep track of all the activities you have permission to see!
back to top
Video tutorial
back to top
| Created on | Jul-17-2013 |
| Last modified on | Sep-17-2015 |