Edit lead
Solution No. 322
OVERVIEW
How to edit a lead
SCREEN OVERVIEW
Edit lead
Buttons
Additional info
Payment and job info
Contacts
Transactions
Activities
Cases
Opportunities
Documents
Overview
Now that you've created some leads and populated your Existing Lead Contacts List, you may need to edit some of the information associated with those leads. Perhaps you've gotten more information from the potential customer, or you need to change the contact associated with it. The Edit Lead screen allows you to edit the details of existing leads, as well as associate them with other entities within Method. Let's go through the steps required to edit a lead!
back to top
How to edit a lead
-
In Method CRM, click Leads > Leads and contacts list.
-
Choose the lead you'd like to edit and click Go to next to the chosen entry. This will open the edit screen as well as a temporary Tab link in your tab link bar. You can navigate away from this tab link and navigate back without losing data you've typed into fields.
-
Ensure both the Lead name and Contact fields are filled out – they do not have to have the same information (you can change both of these fields to suit your needs) but they must be filled out in order for Method to save the lead.
-
From this screen, you can alter any of the existing fields – change the text in writable fields, change the chosen option in dropdown lists, and ensure the lead is active (appearing in your Existing Lead Contacts List) by clicking the check box in the Additional Info section:
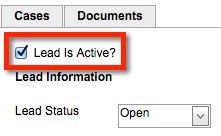
 |
The bottom of the screen features a series of clickable tab sections that each open their own unique set of options. You can choose to edit the information listed in additional info update the payment information view all the lead's transactions and create or edit activities, estimates, invoices and documents associated with this lead. |
-
Click save at the bottom of the screen. This will save whatever changes you've made to the fields in this lead and will update any changes that appear in the viewable portion of the leads and contacts list.
back to top
Screen overview
The following is a breakdown of the Edit Lead screen. We'll take a closer look at each element of the screen (dropdown lists, buttons, etc.) so you know exactly what each element does. We hope this will be a useful roadmap for new users!
back to top
Edit lead
Clicking go to... next to a lead on the Existing Lead Contacts List will open the Edit Lead screen, which will be automatically populated with the information from the original lead.
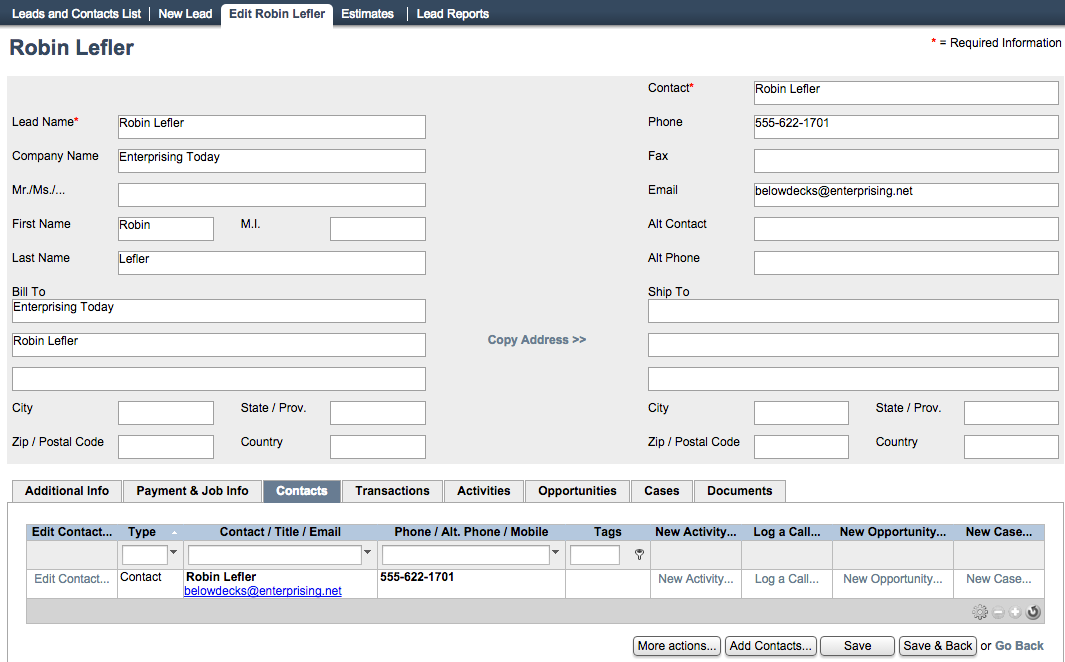
The top half of this screen should look familiar, as it contains all the same fields as the New Lead screen does. For more information on the specifics of these fields, please see the New lead documentation. The only additional fields that exist in this screen are the following:
- Alt contact: This field allows you to provide an alternate contact name for this lead. This is the person you can speak to in case your primary contact is unavailable.
- Alt phone: This is the phone number for the alternative contact.
Neither of these fields is required, so only include this information if you feel it's pertinent.
Below, there is a toolbar of additional options that will open several screens' worth of information that you can use to associate other entities within Method with your lead, as well as fill out additional information within the lead itself. There are also a series of buttons that do not change, regardless which of the toolbar's tabs are open.
back to top
Buttons
At the bottom of the screen you will see some of the familiar buttons you've seen elsewhere in Method.
- More actions: This button will allow you either to Delete lead, which cannot be undone, or bring up the Notes screen. Here you can write notes regarding any additional pertinent information pertaining to this lead, and then either Save it and continue writing, or Save & Close which will return you to the Edit lead screen.
- Convert to customer: This button will convert this lead permanently into a customer, which means it will no longer appear in the Existing Lead Contacts List, nor will it be labeled a Lead within Method. It will appear from now on in the Customers and contacts list and will henceforth be considered a customer record (which means it will sync to your QuickBooks).
 |
When you click this you will be prompted with an "are you sure" message. Be sure, because once the lead becomes a customer, it can't be undone! |
- Save: saves the information on the screen without closing it.
- Save & Back: saves the information on the screen and then returns to you the Existing Lead Contacts List.
- Go back: returns you to the Existing Lead Contacts List without saving the information on the screen.
back to top
Additional info
|
The Job of customer, Type and Terms fields are all to do with QuickBooks. Even though Leads don't sync to QuickBooks, these fields are in place to provide additional information ahead of these leads becoming customers. The same is true of the payment and pricing information you can include: until the lead becomes a customer, this information won't be needed. |
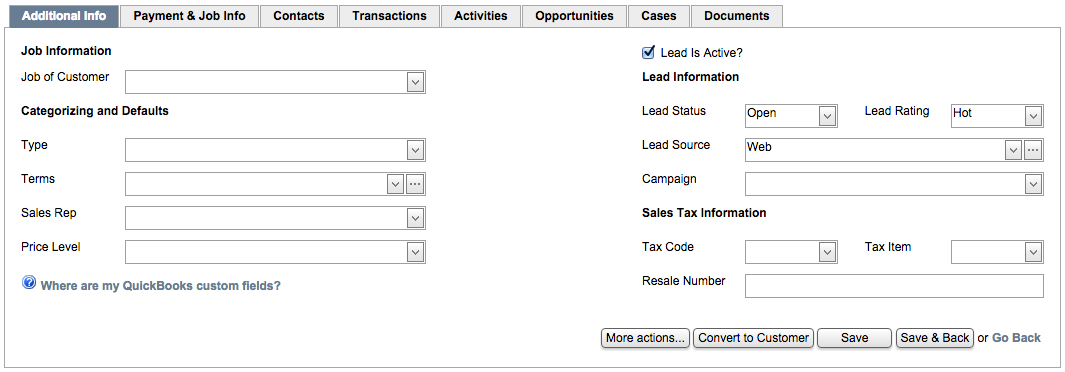
- Job of customer: This dropdown list is used in specific circumstances, notably if you don't want this job to sync to QuickBooks. For more information on customer jobs, please click here.
- Type: This dropdown is actually a "customer type" field.
- Terms: This dropdown list deals with terms of payment – it is a list that originates in QuickBooks and so might be familiar to those of you who use QuickBooks regularly. The types available out of the box are as follows:
- 1% 10 Net 30: Payee gets a 1% discount if the full amount is paid within the first ten days; however, the full amount must be paid within 30 days.
- 2% 10 Net 30: Payee gets a 2% discount if the full amount is paid within the first ten days; however, the full amount must be paid within 30 days.
- Consignment: This usually refers to products, and means your company retains ownership of the product until the second party sells it for you.
- Date driven: A date driven payment is any payment that pertains to specific dates (for example, due on the 15th of the month, regardless when the invoice is received).
- Due on receipt: The payment is due when the invoice is received.
- Net 15: The payment is due within 15 days of reception.
- Net 30: The payment is due within 30 days of reception.
- Net 60: The payment is due within 60 days of reception.
- Sales rep: This dropdown list allows you to choose a sales representative from your Method users to associate with this lead. You can also create a new sales representative, which you can learn how to do in the New Sales Rep documentation.
- Price level: This dropdown list lets you assign a price level associated to a specific group of customers, especially those that might be entitled to a special discount or those who require a markup.
| |
If you have customized QuickBooks fields you want to see appear on this screen, you will have to customize the screen to make them visible. Please get in touch with a Business Solutions Specialist for help with this. |
- Lead is active?: This checkbox must be checked in order for the lead to appear in the Active filter view on the Existing Lead Contacts List.
- Lead status: This is a simple way to denote whether a lead is worth following up. You can choose between "unqualified", "qualified", and "open".
- Open is the default setting when you create a new lead. If a lead is open, it means key pieces of information are missing from your understanding of that lead. You don't yet know whether or not you can meet the needs of this potential customer, you just know there's some interest in having a conversation. Open leads need following up!
- Unqualified means your company doesn't currently address the needs of the lead (for example, you are a self-employed landscaper and the lead requires several football fields Astroturfed – you aren't set up to do that!) This doesn't mean you won't ever be able to address the lead's needs, you just can't right now.
| |
Best practice is to never delete a lead you might be able to serve later, and you can learn how effective your advertising is by determining how many qualified versus unqualified leads were attracted. If you're able to address their needs a year down the road, this lead will already be saved in your CRM! |
- Qualified leads are the best kind: you've determined what the needs of the potential customer are, you're set up to meet those needs, and you've entered into a dialogue with them. This is what can happen when you follow up with an open lead – you get to change the denotation to "qualified".
- Lead source: This is where your lead came from (e.g. employee referrals, print ads, etc). You can also create new lead sources yourself.
- Lead rating: Rating a lead means assessing how applicable your products or services are to this lead's needs.
- Cold: This rating is applied to leads for whom your products or services are not currently useful, but they might be in the future. Instead of marking that lead "unqualified", you can leave it as the default "open" and mark the rating "cold". This provides more detailed information for the lead in Method.
- Warm: This rating is applied to leads for whom only some of your products or services are valuable or applicable.
- Hot: This rating is applies to leads for whom your products or services are definitely applicable. You'll want to get in touch with "hot" leads as soon as possible, because they are the most likely to transition into full-fledged customers. This is also the default setting for lead ratings in Method.
- Campaign: Method does not come with any campaigns pre-loaded; please see Campaigns for more details. This dropdown list allows you to associate this lead with a marketing campaign you've created in Method.
- Tax code: This dropdown list lets you determine whether a sale associated with this lead is taxable or not.
- Tax item: This dropdown list lets you determine whether a sale associated with this lead will be taxed in or out-of-state. Refer to your local state laws for specific information as to whether or not sales are taxable.
- Resale number: You can input a resale number, if applicable.
| |
A resale number is issued by a state or local municipality and gives your company permission to buy products at wholesale prices and re-sell them. |
back to top
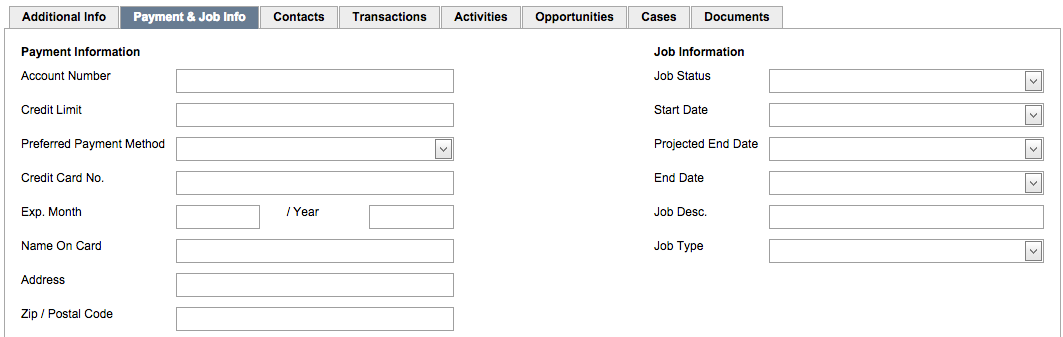
Payment and job info
As on the New Lead screen, this area gives you the opportunity to fill in pertinent details of the lead's payment information.
 |
It is recommended that you do not fill in credit card information at this time. When the lead becomes a customer and is pushed to QuickBooks, any credit card information included will be returned by QuickBooks (which is PCI-compliant) as a series of **** **** **** XXXX with the last four numbers included. |
- Account number: This number is assigned in QuickBooks and syncs to this field in Method.
- Credit limit: This is your lead's credit limit, if applicable.
- Preferred payment method: This drop down list lets you choose from a variety of possible payment options, from major credit cards to PayPal.
- Credit card information: The fields in this section are self-explanatory, and refer to the credit card the lead will use to pay outstanding balances once they become a customer.
- Job status: This dropdown list will allow you to assign a status to the current job.
- Awarded: The job has been awarded to your company and is awaiting a start date.
- Closed: The job is complete, either because it has been finished or cancelled.
- InProgress: The job is currently in progress.
- None: If the job is only hypothetical at this juncture, this would be the best option to choose.
- NotAwarded: The job was not awarded to your company.
- Pending: The job is waiting in queue for one of a variety of reasons.
- Start date: Opens a clickable calendar for you to choose a start date for this job.
- Projected end date: Opens a clickable calendar for you to choose a projected end date for this job.
- End date: Opens a clickable calendar for you to choose a firm end date for this job, if one has been agreed upon between you and the lead.
- Job desc.: Allows you to include a brief description of what the job will entail (e.g. "cut the lawn", "build table", etc.)
- Job type: Lets you choose between two job types: commercial and residential.
- Commercial generally refers to jobs done for a company or business-owned property
- Residential generally refers to jobs done in a private home.
You can add more job types in QuickBooks, and they will be pushed over to the Method dropdown list.
back to top
Contacts
This opens a grid detailing all the contacts you have associated with this lead. For more information on how to navigate grids in Method, see our article on Grid functionality.

The clickable functions of this grid include Edit contact, New activity, Log a call, New opportunity, and New case. Clicking on each of these links will take you to the related pages. Please see the appropriate pages in this guide for more information.
There is also a button marked "Add Contacts", which will open the Add/Edit Contacts (for this lead) screen. Please see the Contacts documentation for more information on this screen.
back to top
Transactions
This opens a grid detailing all the transactions associated with this lead. For more information on how to navigate grids in Method, see our article on Grid functionality.
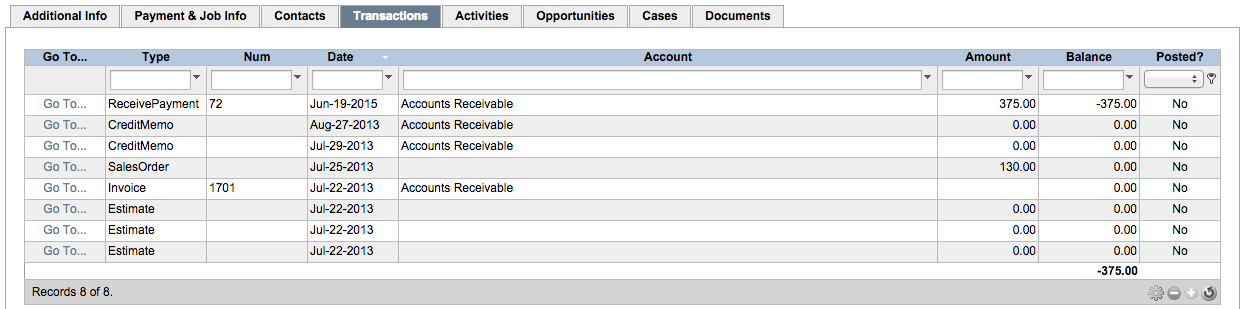
There is also a button marked "New Transaction", which gives you the option of opening one of several new screens, including credit memo, estimate, invoice, receive payment, sales order and sales receipt. When saved, these transactions will be associated with this lead and appear in this grid.
|
Leads can only have transactions associated with them if wait for sync approval is checked (please see the transaction documentation linked above for more information). Once a transaction is synced with QuickBooks, the lead is automatically converted to a customer. |
back to top
Activities
This opens a grid detailing all the activities associated with this lead. For more information on how to navigate grids in Method, see our article on Grid functionality.

There is also a New activity button that opens the New Activity screen. For more information on how that screen operates, please see the New activity documentation.
back to top
Opportunities
This opens a grid detailing all the opportunities associated with this lead. For more information on how to navigate grids in Method, see our article on Grid functionality.

There is also a New opportunity button that opens the New Opportunity screen. For more information on how that screen operates, please see the New opportunity documentation.
back to top
Cases
This tab lists all the cases associated with this lead. For more information on how to navigate grids in Method, see our article on Grid functionality.

There is also a New case button that opens the New Case screen. For more information on how that screen operates, please see the New case documentation.
back to top
Documents
This tab lists all the documents associated with this lead. For more information on how to navigate grids in Method, see our article on Grid functionality.

The Document button at the bottom of the screen gives you the option to Link an existing document or Upload a new document, both of which are explained in the Document section.
back to top
| Created on | Jul-25-2013 |
| Last modified on | Sep-17-2015 |