New activity
Solution No. 304
OVERVIEW
How to create a new activity
How to edit an existing activity
SCREEN OVERVIEW
New/Edit activity
Send an email
Show additional information
Schedule a recurring activity
Schedule a follow-up
Buttons
Video tutorial
Overview
Your day-to-day business is full of interactions you might not even think about, but that are very important to keeping your business up and running. Wouldn't it be nice if you could keep track of every phone call, meeting, email, consultation and follow-up conducted by everyone associated with your Method account? It certainly would – the trail of breadcrumbs theory says it's a good idea to have a record of every activity that takes place during your work day. That's what the Activity section of Method is for: it allows you to create a record for everything you do, keeping you on-task and organized. So, let's get started!
 |
This screen functions the exact same way as the New Appointment, New Task, and Log call screens, with the following differences:
- In the New appointment screen, Method's Type field default is "Meeting".
- In the New task screen, Method's Type field default is "To do".
- In the Log call screen, Method's Type field default is "Phone call incoming".
Remember, you can reset these defaults in your My CRM Preferences tab link under the Home tab.
|
back to top
How to create a new activity
- In Method CRM, click Activities > New Activity, or Activities > Activities list > New Activity button at the bottom of the screen.
- In the Assigned to dropdown list, choose a Method user to whom you wish to assign this activity.
- In the Type dropdown list, choose an activity type that best suits the activity you are creating.
- In the Due on dropdown list, choose a date on which the activity will be due. You can also specify a time by clicking twice within the field and manually typing in a time.
| |
The above fields are the only required fields on this page and represent the minimum amount of information Method needs to create a record of this Activity. However, the more information you provide, the more useful your Activity record will be! For more information on the remaining fields on this page, please see our screen overview below. |
- Click Save at the bottom of the page to save your new activity. This activity will now appear in your Existing Activities List, as well as your Activity Calendar.
 |
Clicking Complete, save & new will mark this activity as "complete", meaning it will not appear by default in your Existing Activities List or your Calendar. |
back to top
How to edit an existing activity
- In Method CRM, click Activities > Activities List and find the activity you want to edit, either searching the list manually or filtering the grid.
- Click Go To... next to your chosen activity to bring up the Edit Activity screen.
- This screen has the same details as the New Activity screen. Change the information in any of the fields and schedule a follow-up or a recurring activity as necessary. Click Save to save your changes and update the record.
Your changes will now be saved both within the activity and in the viewable portions of the Existing Activities List.
back to top
Screen overview
The following is a breakdown of the New activity screen. We'll take a closer look at each element of the screen (dropdown lists, buttons, etc.) so you know exactly what each element does. We hope this will be a useful roadmap for new users!
back to top
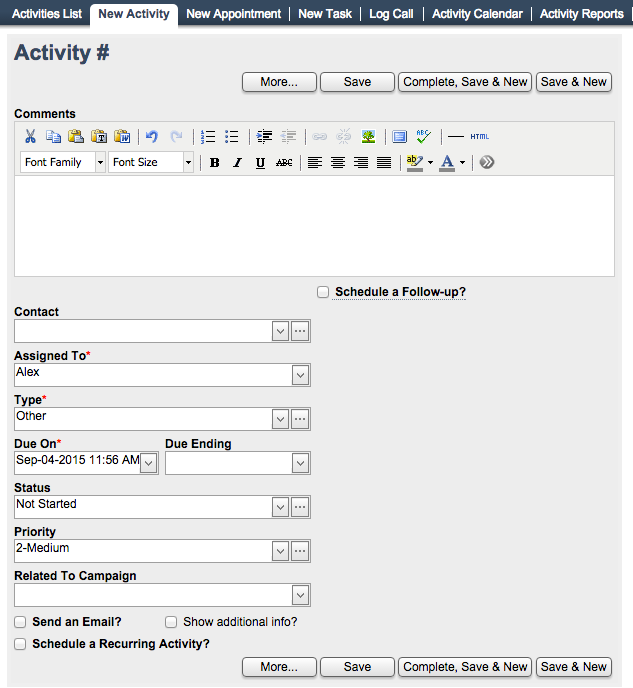
New/Edit activity
You can access the New Activity screen by clicking on the New Activity tab link or by clicking the New Activity button on the Existing Activities List screen. The Edit Activity screen is identical to this one and can be accessed by clicking go to... next to an activity in your Existing Activities List, where you will see the information you saved for this activity displayed in these fields. Let's take a look at the individual elements of this screen – understanding them is the key to learning how to create a new activity and edit an existing one!
|
There are a number of other places throughout Method where you can access the New Activity screen (e.g. in different tabs). They will be noted in the documentation where they appear. |
- Comments: Adding a comment to an activity allows you to provide context to the activity. That information will be displayed on the far right of your Existing Activities List. The field is also capable of full HTML formatting (see HTML Editor for more information).
| |
These comments are internally viewable only – your customers will never see them (unless the activity was created within a Case). |
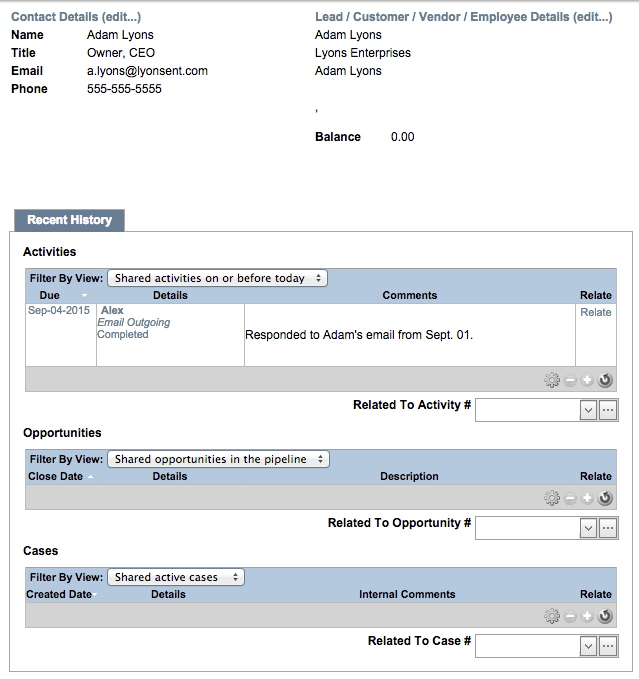
- Contact: Choose a contact to associate with your activity. You can also add a new contact by clicking the ellipses button (...) to open the New/Edit Contact screen. Clicking on an existing contact will open the Recent History screen for that contact to the right of the New Activity section, where you can view any Activities, Opportunities, and Cases associated with that contact. For more information, please see Contact Recent History.
- Assigned to: Assign this activity to an active user in your Method CRM account.
- Type: Choose a type for your activity, or create a custom type. Please Activity types for more information.
- Due on: Choose a date on which the activity will be due. You can change the time by highlighting the time within the "Due on" field and typing in a time manually.
- Due ending: Set an end date and time for an activity, the same way you set "Due on".
- Status: Choose a status for your activity, or create a custom type. Please see Activity Statuses for more information.
- Priority: Choose a priority for your activity, or create a custom priority. Please see Activity Priorities for more information.
- Related to campaign: Relate your activity to an existing marketing campaign. If you don't have any campaigns set up, nothing will appear in this dropdown list. See our Campaign documentation for more information.
back to top
Send an email
Clicking this box will bring up the Email Template screen. From here you can choose from stock templates as well as any templates you've created in Method CRM, or you can fill out the information manually just like you would in your regular email form. If you haven't created any templates personally, only the stock ones will appear in the dropdown list. For more information, see our documentation on Email Templates.
back to top
Show additional information
This option opens a few more options that aren't required, but can be helpful in tracking your activities with more detail.
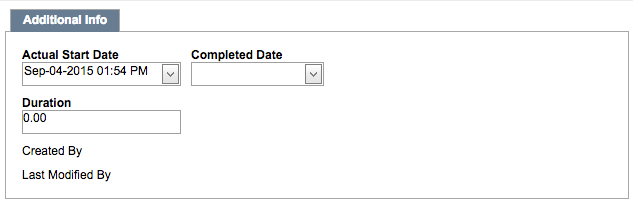
- The Actual Start Date can be applied to an activity previously scheduled to occur at a given time, but that unexpectedly occurs earlier or later (such as a phone call). The Due On date stays the same, but the Actual Start Date reflects when the activity actually happened.
- The Completed Date option lets you keep track of when an activity whose due date has already passed was actually completed, if it wasn't done on the recorded due date. This option isn't necessary for activities planned for the future.
- The Duration option lets you choose an hour/minute duration for an activity. This is helpful for activities like meetings or phone calls that are often of limited duration.
- Once an activity is saved, the Created By and Last Modified By fields will reflect which Method user created the activity and which Method user last modified the activity.
back to top
Schedule a recurring activity
Clicking on the schedule a recurring activity check box opens the Schedule a recurring activity screen. This is where we can turn an occurrence into a series. Remember when we talked about the difference? To recap, an occurrence (or single activity) scheduled to recur regularly is called a series. By scheduling a recurring activity, we are telling Method that we want this occurrence to happen over and over again at times and dates this screen will allow us to specifically choose. The particulars of this screen are covered in Scheduling a recurring activity.
back to top
Schedule a follow-up
Clicking on the schedule a follow-up check box opens the Schedule a follow-up screen.
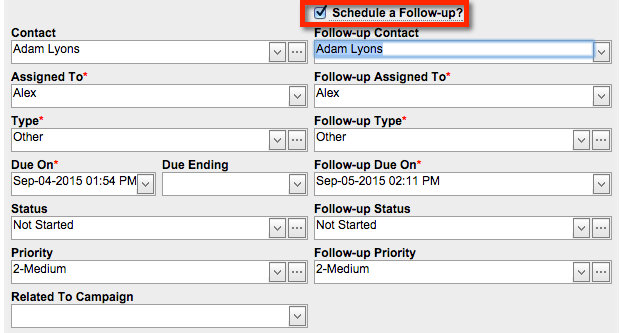
As you can see, this screen looks almost exactly like the main New Activity screen, and with good reason: most of the same information is required to schedule a follow-up after an activity like a meeting or phone call. From this menu you can
- choose from your Method-populated list of contacts (does not need to be the same contact as the original activity)
- assign the follow-up to a user (does not need to be the same user as the original activity)
- choose a follow-up type
- schedule a due date for the follow-up
- mark its status
- determine the level of priority
back to top
Buttons
At the bottom and top of the New Activity screen you will see four buttons. These buttons each serve a unique function.
- More allows you to choose an email template to associate with the activity, Clear/New which will clear the fields in this activity and make room for a new one, or Delete Activity which cannot be undone.
- Save saves the information on the screen without closing it.
- Complete, Save & New allows you to save the activity but also change its status to complete, which means it will no longer appear in your active filter views. It will, however, appear in the history for the Contact, which can be found by accessing the Customer List (see the Customers and contacts list section). The activity will also appear in the My Occurrences and Shared Occurrences filter views. The button will then clear the fields and ready the screen for a new activity to be inputted.
- Save & New saves your activity, then clear the fields and readies the screen for a new activity to be created.
back to top
Video tutorial
back to top
| Created on | Jul-17-2013 |
| Last modified on | Sep-17-2015 |