Contacts
Solution No. 299
OVERVIEW
How to add a new contact
How to edit an existing contact
SCREEN OVERVIEW
Add/edit contacts
Check boxes
Buttons
Video tutorial
Overview
A contact in Method refers to the person who is your go-to for a customer account. Sometimes the customer and contact are one and the same (as with many self-employed business owners), and sometimes they're the representative of a larger company. Either way, having a contact's pertinent information on file allows you to keep track of him/her and create a trail of breadcrumbs for all your interactions with that person!
back to top
How to add a new contact
In order to add a contact, you must have an existing Customer to associate to. That means that adding and editing contacts can happen from a variety of places throughout Method. This description will show you how to add a contact from the Customers tab. For the purpose of this description we will assume you are adding a new contact to an existing customer. To add a contact to a new customer, please see the New customer documentation.
- From Method CRM, go to Customers and contacts list and choose the customer to which you'd like to add a contact. Click go to next to that customer to open the Edit customer screen.
- Scroll down to the tab sections along the bottom and click the Contacts tab section.
- Click on the green Add contacts button. This will generate the Add/Edit contacts for… screen (the title of the screen will contain the name of the customer).
- The only required field on this screen is Name. This is usually a conglomerate of the First Name and Last Name fields, which will auto-populate if you put a first and last name in the Name field.
 |
The rest of the fields on this screen are optional, but it is recommended you fill in as much information as you have available so you don't have to do it later, and so you have as detailed a record of this contact as possible. For more information on the optional fields, see the Screen Overview section below. |
- Click Save & New to save and clear the changes, or Save & Close to save and return to the Edit customer screen. This contact will now appear in the Contacts grid under the Contacts tab section for this customer, and the Customers and contacts list in the Customers tab.
back to top
How to edit an existing contact
- Repeat Steps 1 and 2 from above.
- Choose the contact you want to edit from the Contacts grid, and click Edit contact. This will open the Add/Edit contacts for… screen and populate the fields with the information already associated with this contact.
- From here, you can alter any of the information contained in the fields on the screen.
- Click Save & New to save and clear the changes, or Save & Close to save and return to the Edit customer screen. The changes you've made will now appear wherever this Contact is selected.
back to top
Screen overview
The following is a breakdown of the Add/edit contacts screen. We'll take a closer look at each element of the screen (drop down menus, buttons, etc.) so you know exactly what each element does. We hope this will be a useful roadmap for new users!
back to top
Add/edit contacts
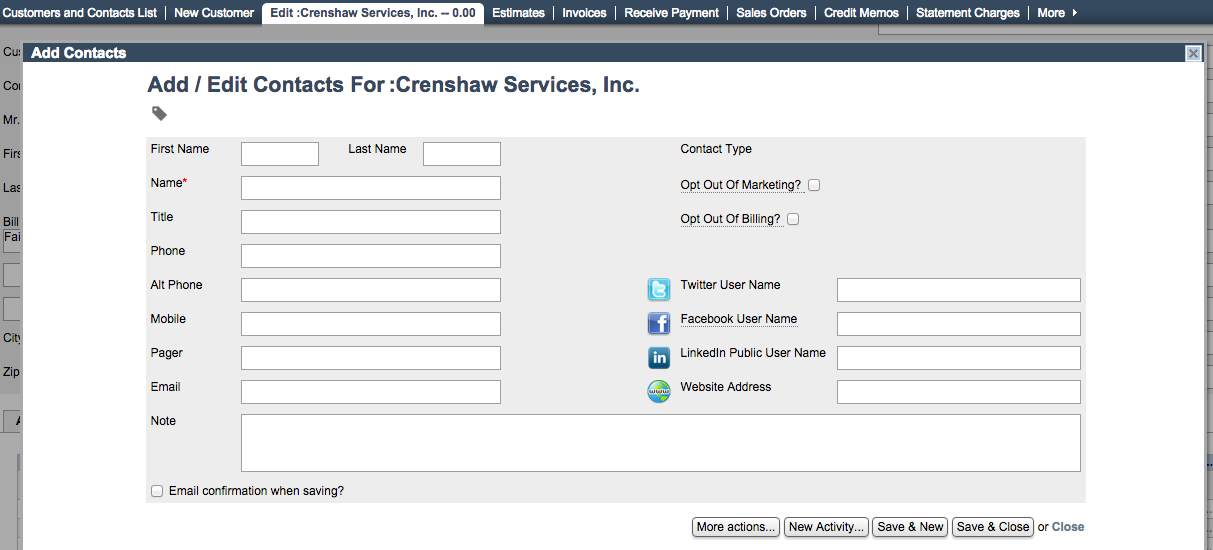
- First Name/Last Name are the first and last names of the contact
- Name is the contact's full name, pulled from the first and last name fields
- Title refers to the contact's title within the company (e.g. CEO or Accountant)
- Phone is usually the contact's primary phone number
- Alt phone should be a reliable alternative phone number for the contact
- Mobile refers to the contact's cell phone
- Pager refers to the contact's pager number, should they have one
- Email is the contact's primary email address
- Twitter user name can refer to the company Twitter account or the individual contact's account if appropriate (displayed as @username)
- Facebook user name can refer to the company Facebook page or the individual contact's profile if appropriate (displayed as facebook.com/username)
- LinkedIn public user name can refer to the company's LinkedIn profile or the individual contact's profile if appropriate
- Website address usually refers to the website of the contact's company
- Notes allows you to take down any pertinent notes about this contact – what you put in that field is up to you!
- Contact type refers to whether this is:
- the main customer contact (the one associated with a QuickBooks file),
- an alternate contact (one associated only with Method), or
- a QB contact (one associated with QuickBooks).
- If the contact type field is blank, that means the contact is only associated with Method and can be deleted by using the Delete contact option under More action.
back to top
Check boxes
The check boxes on this page allow you to modify certain automatic settings associated with this contact.
- Opt out of marketing means the contact will be flagged to not receive marketing mail, emails, or phone calls
- Opt out of billing means the contact will be flagged to not receive billing mail, emails, or phone calls
- Clicking on Email confirmation when saving will change two buttons at the bottom of the screen: Save & New becomes Save & Email, and Save & Close becomes Save, Email & Close. When you choose any of those options, a confirmation email will be sent to the Assigned to user and the contact that is being updated, presuming there is an email address associated with that contact. The email that is sent depends on the email template being used.
- You can assign tags to this contact. Learn more about tags by clicking here.
back to top
Buttons
The More actions button at the bottom of the screen gives you access to several other options.
- Choose email template allows you to change the template sent out to the Assigned to user and the contact email when you have clicked the Email confirmation when saving option. Clicking on Choose email template will bring up the Choose email template screen (learn more about it in the Email templates and categories section).The two dropdown lists within Choose email templates associated with the Add/Edit contacts screen are Contact add and Contact edit.
- Under Contact add, the two template options are Contact added, which informs the user and contact that a new contact has been added to Method, and Contact update, which informs the user and contact their contact information has been edited and/or updated
- Under Contact edit, the two viable template options are the same, and will create the same templates.
- Save & close saves your changes to the template options.
- Clear/new clears the fields on the edit screen in preparation for a new contact to be added.
- Delete contact deletes the contact permanently.
- The New Activity button will bring up the New Activity screen (see New activity for details!). The activity will automatically be associated with this contact.
- Save & New saves the existing edits to this contact and refresh the screen with empty fields so you can create a new contact.
- Save & Close saves the existing edits to this contact and close the Add/Edit Contacts screen.
back to top
Video tutorial
back to top
| Created on | Jul-17-2013 |
| Last modified on | Sep-17-2015 |