New lead
Solution No. 321
OVERVIEW
How to create a new lead
SCREEN OVERVIEW
New lead
Lead information
Additional info
Overview
Congratulations! Someone has found your business and is interested in what you have to offer. This person or organization is called a lead and Method CRM is designed to help keep track of just these sorts of business opportunities. Method allows you to create a new lead in much the same way as a new customer would be created within the system. This will allow you to maintain a database of potential customers, allowing you to maximize your potential revenue. So, let's get started!
 |
A lead is a CRM-specific term, which means leads do not appear in your QuickBooks file. They will only appear once they have been converted to customer status. |
back to top
How to create a new lead
-
In Method CRM, click Leads > New Lead
-
Type in the name of the new lead in the Lead name field (for example, Superior Plumbing).
-
Type in a contact name for the new lead in the Contact field (for example, Bob Crenshaw).
 |
The above fields are the only required fields on this page and represent the minimum amount of information Method needs to create a record of this Lead. However, the more information you provide, the more useful your Lead record will be! For more information on the remaining fields on this page, please see our screen overview below. |
-
Click Save at the bottom of the page to save all information you've inputted into the above fields. This lead will now appear in your Leads and Contacts List.
back to top
Screen overview
The following is a breakdown of the New Lead screen. We'll take a closer look at each element of the screen (drop down menus, buttons, etc.) so you know exactly what each element does. We hope this will be a useful roadmap for new users!
back to top
New lead
You can access the New lead page by clicking on the New Lead tab link. Let's take a look at the individual elements of this screen – understanding them is the key to learning how to create a new lead! Many of these fields are common knowledge (first name and last name, for example), so let's focus on the ones that are unique to this page.
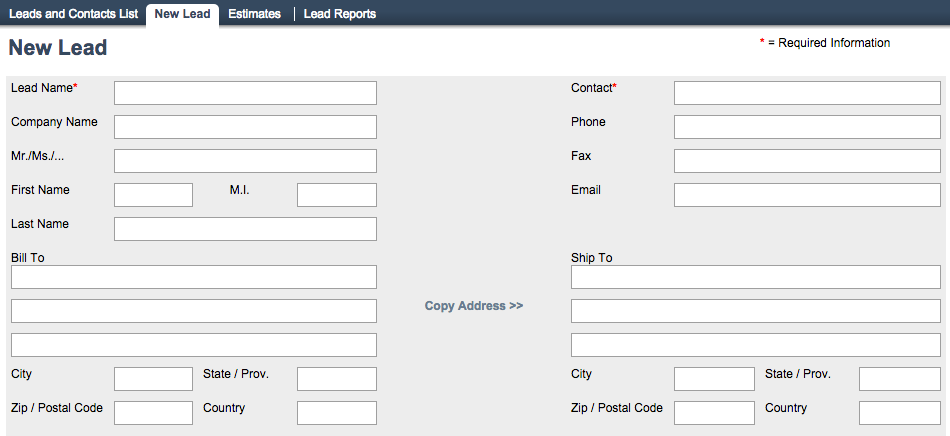
- Lead name: The lead name, a required field, might be the name of an individual or of a company, which means it might be the same as what goes in the Company Name or Contact fields, but it doesn't have to be. This name appears in the Lead section of the "Contact/Lead/Company" column in your Existing Leads and Contacts List.
- Contact: Also a required field, the Contact is your go-to person at the lead's company. This could be the owner of a small business, the receptionist for a larger company, or an account manager with a major corporation, just to name a few. This name appears in the "Contact" section of the "Contact/Lead/Company" column in your Existing Leads and Contacts List.
- Copy address: This handy button will save you time by automatically filling in the "Ship to" address fields with the information you input into the "Bill to" fields!
back to top
Lead information
Directly below the New lead screen is a secondary section called Lead information. Let's take a look at this section now.
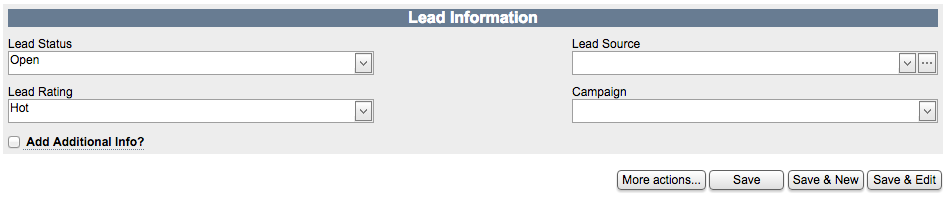
- Lead status: This is a simple way to denote whether a lead is worth following up. You can choose between "unqualified", "qualified", and "open".
- Open is the default setting when you create a new lead. If a lead is open, it means key pieces of information are missing from your understanding of that lead. You don't yet know whether or not you can meet the needs of this potential customer, you just know there's some interest in having a conversation. Open leads need following up!
- Unqualified means your company doesn't currently address the needs of the lead (for example, you are a self-employed landscaper and the lead requires several football fields Astroturfed – you aren't set up to do that!) This doesn't mean you won't ever be able to address the lead's needs, you just can't right now.
| |
Best practice is to never delete a lead you might be able to serve later, and you can learn how effective your advertising is by determining how many qualified versus unqualified leads were attracted. If you're able to address their needs a year down the road, this lead will already be saved in your CRM! |
- Qualified leads are the best kind: you've determined what the needs of the potential customer are, you're set up to meet those needs, and you've entered into a dialogue with them. This is what can happen when you follow up with an open lead – you get to change the denotation to "qualified".
- Lead source: This is where your lead came from (e.g. employee referrals, print ads, etc). You can also create new lead sources yourself.
- Lead rating: Rating a lead means assessing how applicable your products or services are to this lead's needs.
- Cold: This rating is applied to leads for whom your products or services are not currently useful, but they might be in the future. Instead of marking that lead "unqualified", you can leave it as the default "open" and mark the rating "cold". This provides more detailed information for the lead in Method.
- Warm: This rating is applied to leads for whom only some of your products or services are valuable or applicable.
- Hot: This rating is applies to leads for whom your products or services are definitely applicable. You'll want to get in touch with "hot" leads as soon as possible, because they are the most likely to transition into full-fledged customers. This is also the default setting for lead ratings in Method.
- Campaign: Method does not come with any campaigns pre-loaded; please see Campaigns for more details. This dropdown list allows you to associate this lead with a marketing campaign you've created in Method.
back to top
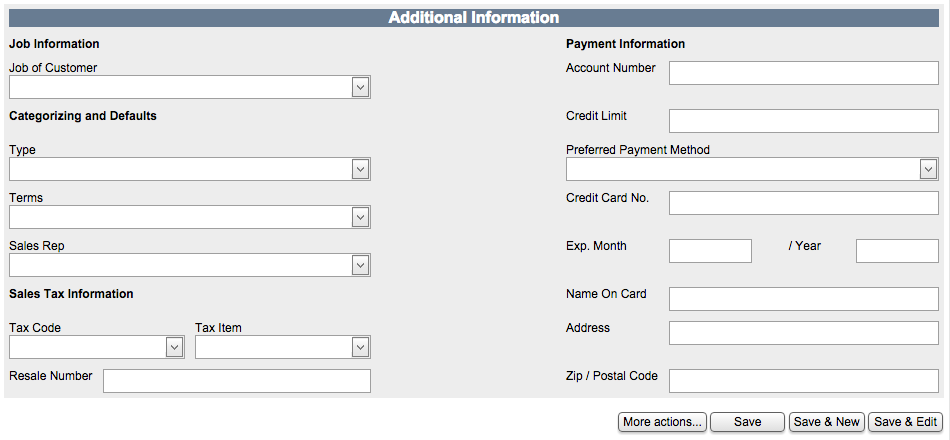
Additional info
The New lead screen also features a check box labeled Add additional info. If you click it, it will open a second part of the screen called Additional Information. Here you will see a series of fields that allow you to add job information, customer defaults, payment and sales tax information related to this lead. None of this is mandatory information, but the more information you have on a lead, the less you'll need to fill in when they become a customer!
|
The Job of customer, Type and Terms fields are all to do with QuickBooks. Even though Leads don't sync to Quickooks, these fields are in place to provide additional information ahead of these leads becoming customers. The same is true of the payment information you can include: until the lead becomes a customer, this information won't be needed. |
- Job of customer: This dropdown menu is used in specific circumstances, notably if you don't want this job to sync to QuickBooks. For more information on customer jobs, please click here.
- Type: This dropdown is actually a "customer type" field.
- Terms: This dropdown list deals with terms of payment – it is a list that originates in QuickBooks and so might be familiar to those of you who use QuickBooks regularly. The types available out of the box are as follows:
- 1% 10 Net 30: Payee gets a 1% discount if the full amount is paid within the first ten days; however, the full amount must be paid within 30 days.
- 2% 10 Net 30: Payee gets a 2% discount if the full amount is paid within the first ten days; however, the full amount must be paid within 30 days.
- Consignment: This usually refers to products, and means your company retains ownership of the product until the second party sells it for you.
- Date driven: A date driven payment is any payment that pertains to specific dates (for example, due on the 15th of the month, regardless when the invoice is received).
- Due on receipt: The payment is due when the invoice is received.
- Net 15: The payment is due within 15 days of reception.
- Net 30: The payment is due within 30 days of reception.
- Net 60: The payment is due within 60 days of reception.
- Sales rep: This dropdown menu allows you to choose a sales representative from your Method users to associate with this lead. You can also create a new sales representative, which you can learn how to do in the New Sales Rep documentation.
- Tax code: This dropdown menu lets you determine whether a sale associated with this lead is taxable or not.
- Tax item: This dropdown menu lets you determine whether a sale associated with this lead will be taxed in or out-of-state. Refer to your local state laws for specific information as to whether or not sales are taxable.
- Resale number: You can input a resale number, if applicable.
| |
A resale number is issued by a state or local municipality and gives your company permission to buy products at wholesale prices and re-sell them. |
- Account number: This number is assigned in QuickBooks and syncs to this field in Method.
- Credit limit: This is your lead's credit limit, if applicable.
- Preferred payment method: This drop down list lets you choose from a variety of possible payment options, from major credit cards to PayPal.
- Credit card information: The fields in this section are self-explanatory, and refer to the credit card the lead will use to pay outstanding balances once they become a customer.
|
It is recommended that you do not fill in credit card information at this time. When the lead becomes a customer and is pushed to QuickBooks, any credit card information included will be returned by QuickBooks (which is PCI-compliant) as a series of **** **** **** XXXX with the last four numbers included. |
There are four buttons at the bottom of this screen that should be familiar from other areas of method. Let's take a look at each of their functionality.
- More actions allows you to Clear/New which will clear the fields in this lead and make room for a new one, or Delete lead which cannot be undone.
- Save saves the information on the screen without closing it.
- Save & New saves the information on the screen and clears the fields to make room for a new one.
- Save & Edit saves the information on the screen and takes you to the Edit lead screen.
| Created on | Jul-25-2013 |
| Last modified on | Sep-17-2015 |