This section will address how to use the functionality within the Outlook Plug-In to add new records to Method, including contacts/leads/customers/vendors and to add and edit cases and opportunities.
The plug-in does not allow you to edit the information of existing records in Method from Outlook. If you want to update contact information for an existing contact/lead/customer/vendor, you’ll have to do that in Method.
Add a new contact/lead/customer/vendor to Method[top]
When you receive an email in Outlook from an individual who doesn’t currently exist in your Method account (for example, a lead interested in your business), you can add that individual’s information to Method using the Outlook Plug-In, without leaving the Outlook environment!
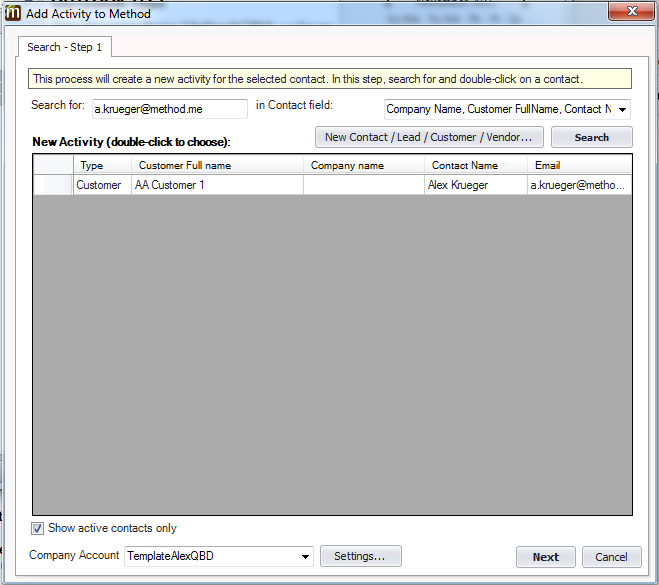
Select or open the email you received, then click Add to Method on the Outlook toolbar. This will take you to Step 1 of the process.
If this person was already in your Method account, he/she would appear in the New Activity grid below. A new entry will not, so click New Contact/Lead/Customer/Vendorto proceed.
If you use more than one company account in the plug-in, or you are running a multi-tenancy account, it’s possible this person could be saved in a different account. To check, simply use the Company Account dropdown to switch accounts while on Step 1!
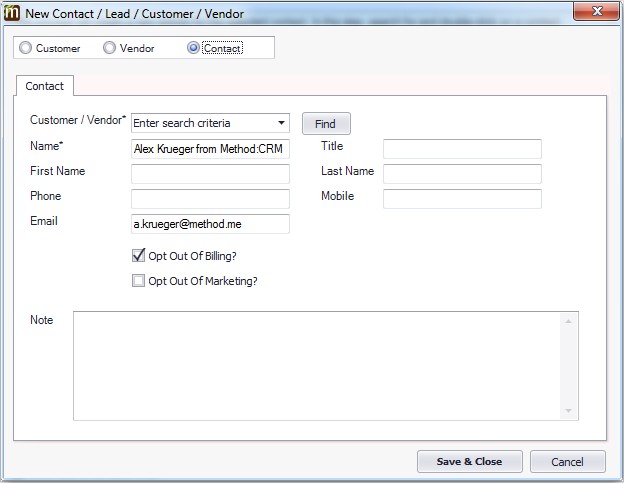
Identify whether you want to create a new Contact, Vendor, or Customer.Once the new customer, vendor or contact has been created, you are returned to Step 1, where you can now select your new record and create an activity for this contact in Method. If you just want to create the contact, click Cancel.
If you create a new contact, you will be asked to choose an existing Customer or Vendor to relate it to. This is what the add contact screen looks like:
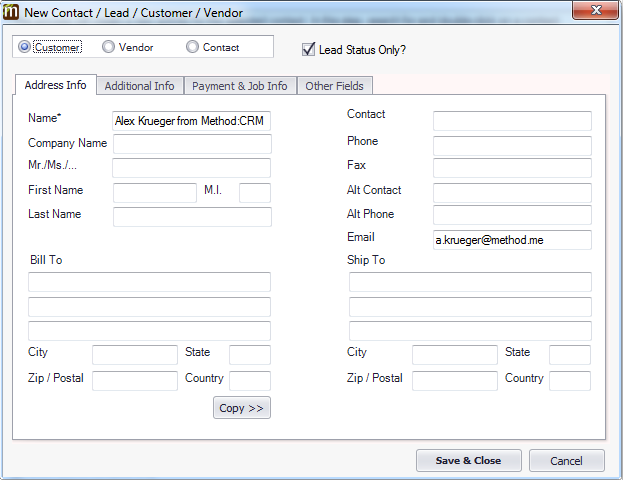
If you create a new vendor or customer, they are automatically assigned lead status unless you uncheck the lead status only box. Here is what the add customer screen looks like: and here is what the add vendor screen looks like: Fill in as much data as you need in the Address Info, Additional Info, Payment & Job Info, and Other Fields tabs, then click Save & Close.
The info tabs are identical to their counterparts in Method, including required fields. For more information on those tabs, click the links. The Other Fields tab allows you to add text and numeric fields (such as sales manager or credit card number), date fields (such as a created date), dropdown fields (such as lead status), and the corresponding value for those fields. This allows you to add as much detail to your new customer, contact or vendor from Outlook as you can in Method.
Once the new customer, vendor or contact has been created, you are returned to Step 1, where you can now select your new record and create an activity for this contact in Method. If you just want to create the contact, click Cancel.
Method best practice says you should always create an activity to log an interaction with a customer, vendor or lead, so if this is the first time you’re hearing from or reaching out to them, it’s especially important to log that interaction. See our next steps for details.
Add a new activity/case/opportunity to Method[top]
When you select an email from a Contact/Lead/Customer/Vendor (new or existing), you are given the option to create new activities, cases and/or opportunities for this individual. If this is a new contact/lead/vendor/customer, please follow the steps above to add them to Method, then click next to continue to these steps.
Select or open the email, then click the Add to Method button on the Outlook toolbar.
On Step 1, you'll see your Method contact show up in the New Activity grid. Select the appropriate contact this email was received from and click Next.
There's a checkbox on the bottom left of this screen which gives you the option to Show active contacts only (this is the default setting). If this is left unchecked, all Contacts will be displayed.
On Step 2, you are given several options:
Just add an activity for this contact
New case
Existing case
New opportunity
Existing opportunity
For this walkthrough, choose either Just add an activity for this contact, New case, or New opportunity. This will open the New Activity / Case / Opportunity screen, where you can fill in the details.
The screens for adding a new activity, case or opportunity have the same fields as the ones found in Method, so for a detailed description of those fields, click the following links:
If you are creating an activity (such as logging a received email), you can finish by clicking Add to Method. Otherwise, you will need to create an activity to record your new case or opportunity by filling out the activity details as normal.
For example, if you received an email from a customer having a tech problem, you may wish to open a case to address their issue. However, you will also want to log that you received their email. The activity you create by filling in those details will be associated both with this customer and their case! The same is true of opportunities: creating an activity to log the interaction will associate it with the customer and their opportunity!
When you are finished, click Add to Method. The next time Outlook syncs, these new records will be pushed over to Method.
You can choose to verify this by going into your Method account and checking your activity, opportunity, and/or case lists, but the whole point of the Outlook Plug-In is that you don’t have to!
In some cases, you will need to refer to an opportunity or a case that already exists for a customer or lead. This can be done through Outlook as well!
Follow step 1 and 2 above. When you reach Step 2 of the Add activity to Method screen, choose either Existing case or Existing opportunity. Locate the active case or opportunity you’d like to modify in the grid and double-click it to continue to the case or opportunity screens.
By default, closed cases and opportunities are not shown, but sometimes you will need to re-open them. To display closed cases and opportunities, uncheck the relevant boxes below the grids.
On these screens, you can modify existing information about the case/opportunity (e.g. change the priority or lead status). When you’ve made your changes, proceed to Activity Details.
As before, you’ll want to create an activity explaining why you’ve returned to this existing case or opportunity. This helps you maintain a full picture of your interactions with this customer or lead!
When you have filled out the new activity, click Add to Method. This will update the case/opportunity in Method as well as associate your new activity with the case/opportunity and the contact!
Of course, Outlook is designed predominantly to send and receive emails, but with the Outlook Plug-In, you can keep track of your emails using the Activity function in Method! Here’s how to do it.
Either choose a contact from your list and click email, or if you are replying, click reply in the selected email. Both of these options will bring up the email window with two Method-specific buttons visible at the top:
Compose your email as normal. When you are satisfied, you can either click Address to search for and add CC or BCC addresses from your Method account (for example, an employee email address), or you can click Send.
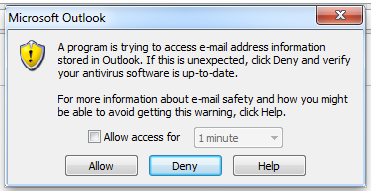
When you do, you will see this warning: This just means Method is attempting to access your Outlook information. You can allow access for up to 10 minutes, then click Allow.
You are then brought to the Add Activity to Methodscreen, where you can create an activity to log this interaction as well as create a case or opportunity to associate with it. Please see the previous steps in this documentation for instructions.
If for some reason you do not wish to create an activity, case or opportunity, you can click Cancel, where you will be asked if you would still like to send the email. Click Yes to send. Remember, it’s Method best practice to log this interaction with an activity!
You may also receive this verification notice: This is to prevent automated programs from sending spam. Simply fill in the captcha and click OK.
And you’re done! Your email has been sent and, if you have created an activity, it has also been logged in Method!
 and here is what the add vendor screen looks like:
 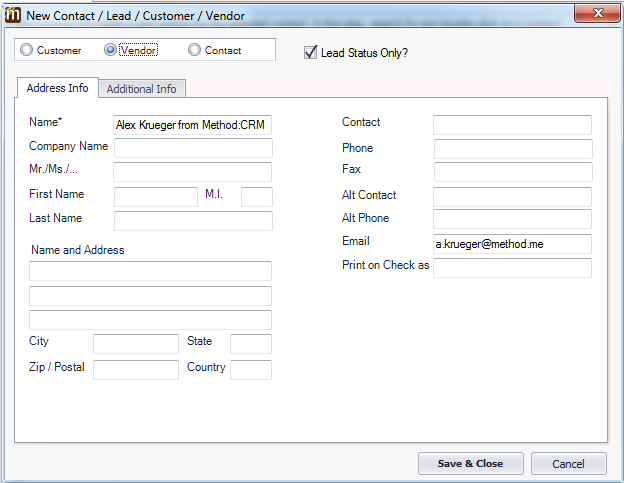 Fill in as much data as you need in the
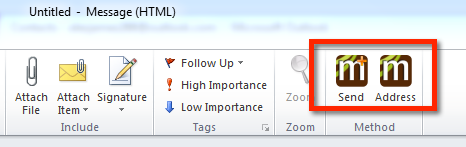
 This just means Method is attempting to access your Outlook information. You can allow access for up to 10 minutes, then click Allow.
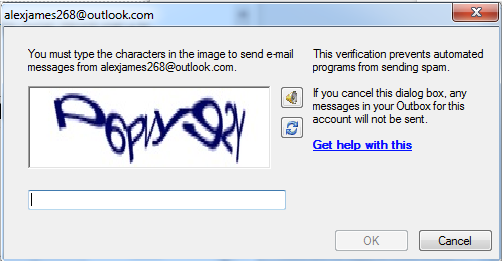 This is to prevent automated programs from sending spam. Simply fill in the captcha and click OK.