Permissions and roles
Solution No. 866
Permissions determine which tabs and tab links each of your Method users can access. Rather than assigning permissions directly to individual users, we assign permissions to a role, and then assign that role to one or more users.
Why do we assign permissions?[top]
You may not want all users to be able to access certain functionality in Method, or that functionality might not pertain to their job. Assigning permissions lets you determine what each user can access when they are signed into Method.
For example, your sales team does not use Campaigns, and you do not want them to be able to customize screens. Assigning the sales team members a role that restricts access to the Campaigns and Customize tabs helps keep their Method accounts neat and tidy, and keep your information safe as well.
Tabs and tab links a role does not have permission to access do not appear for the user assigned that role.
Why do we assign roles?[top]
Assiging permissions to roles means you can give multiple users the same permissions without having to set up each user individually. This also means you can give new users (e.g. a new employee) a role with permissions that work best for their job description.
Method comes with a set of stock roles that already have permissions assigned to them. The permissions are assigned on a by-tab basis, with the option of assigning a second layer of permission for the tab links in each tab. Out of the box, if a role has access to the tab, that role can access all tab links within that tab.
The following are the standard permissions assigned to roles in Method. These permissions can be modified as needed (see Assign tab/tab link permissions to roles).
| Role |
Permission/Access |
| Administrator |
All tabs |
| Director |
All but QuickBooks tab |
| Accountant |
All tabs |
| Manager |
All but QuickBooks tab |
| Customizer |
All tabs |
| Staff |
All but QuickBooks tab |
| Guest |
Only Contacts Portal and Documents tabs |
| Public |
Only Contacts Portal and Documents tabs |
Assign roles to users[top]
The following steps will show you how to assign a role to a user.
Users can be assigned more than one role, but the permissions associated with the highest-level role override lesser roles. For example: If Bill is assigned both the Director and Accountant roles, he will have access to everything a Director is allowed to see, even if the Accountant permissions are revoked.
- Click Customize > Roles. This opens the Roles screen.
- Choose the role you wish to assign and click Edit. This opens the Edit Role screen.
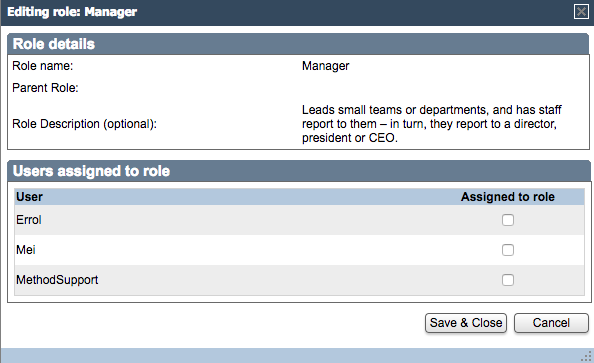
- Choose the Method user(s) you wish to assign this role and check the box next to their name(s). Roles can be assigned to as many users as you want.
- Click Save & Close to save their changes. These permissions will take effect the next time this user logs into Method.
If a user is already logged in and changes are made to their permissions, they will have to log out and log back in for the changes to take effect.
Assign tab permissions to roles[top]
Once you have assigned roles to your users, it's time to set up what permissions those roles will grant them. Changing permissions can involve granting and/or removing access to tabs for a role.
The following steps will show you how to alter the Activities tab permissions for the Staff role, but the same steps can be followed for any of the listed tabs and roles.
It is recommended that the Administrator role have access to all tabs, since the primary admin is assigned this role automatically.
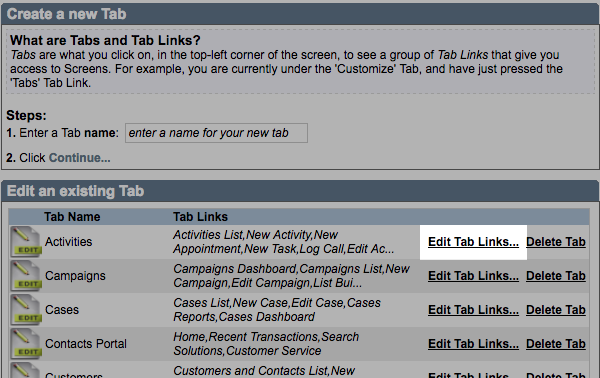
- Click Customize > Tabs.
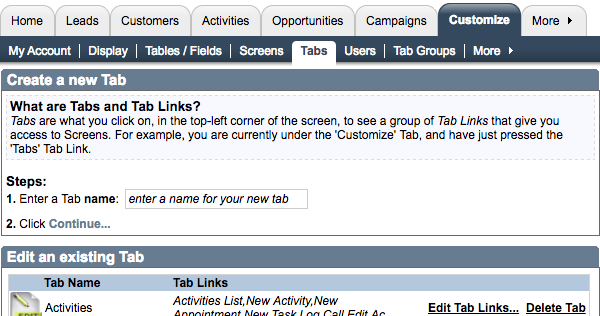
- From Edit an existing Tab, choose the tab whose permissions you wish to add or remove from a role (e.g. Activities) and click Edit:
This opens the Edit Tab screen. 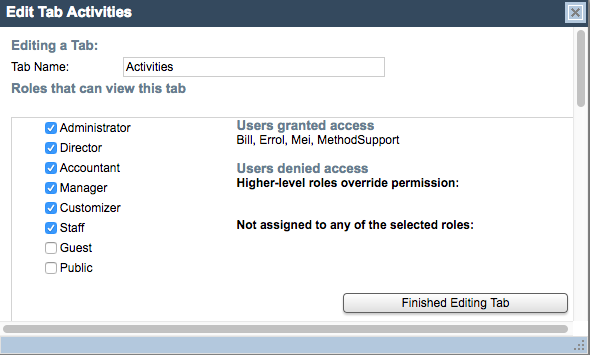
- To remove access to the Activities tab for all users assigned the Staff role, uncheck Staff.

All users assigned the Staff role are moved to Not assigned to any of the selected roles.
Users only appear in Users denied access if they are assigned multiple roles and the highest-ranked role is unchecked. Regardless of how permissions are assigned, roles are ranked from most to least access, with Administrator at the highest level of access.
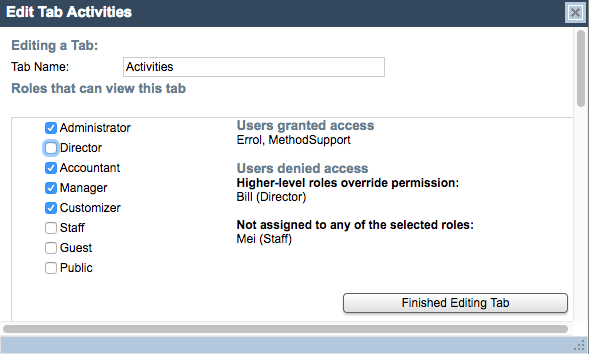
In the above example, Bill is assigned both Director and Accountant roles, each of which can access the Activities tab. Had the Accountant role been disallowed access, Bill would still have his Director access. With Director disallowed, Accountant is overridden and Bill is considered denied.
- Click Finish editing tab to save your permissions, then repeat this process for any other tab you wish to alter.
Assign tab link permissions to roles[top]
Changing permissions can involve granting and/or removing access to tab links for a role. The following steps will show you how to alter the tab link permissions for the Staff role, but the same steps can be followed for any of the listed roles.
It is recommended that the Administrator role have access to all tab links, since the primary admin is assigned this role automatically.
- Click Customize > Tabs.
- From Edit an existing Tab, choose the tab whose tab links you wish to alter and click Edit tab links:
This opens the list of tab links for this tab.
- Choose the tab link whose permissions you wish to add or remove from a role and click Edit.
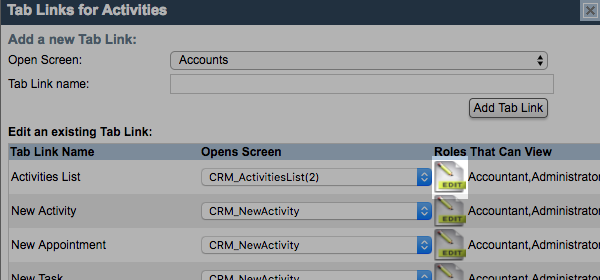
This opens the Edit Tab Link screen. 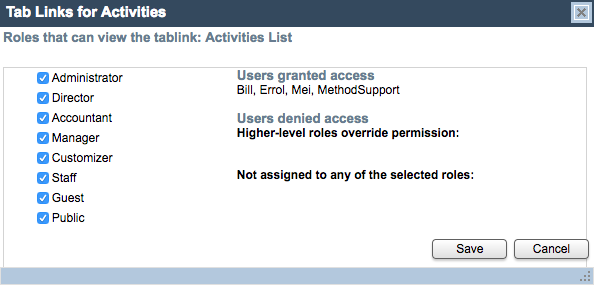
- To remove access to the Activities Dashboard tab link for all users assigned the Staff role, uncheck Staff. All users assigned the Staff role are moved to Not assigned to any of the selected roles.
Please see Assign permissions to tabs for a note on users denied access.
- Click Save to save your permissions, then repeat this process for any other tab link you wish to alter.
Create additional roles[top]
In some situations you may wish to create a custom role (e.g. if you wanted to limit a contractor's Method access without assigning him a role already assigned to other staff members). The following steps will show you how to create a role that can then be assigned permissions as we've described above.
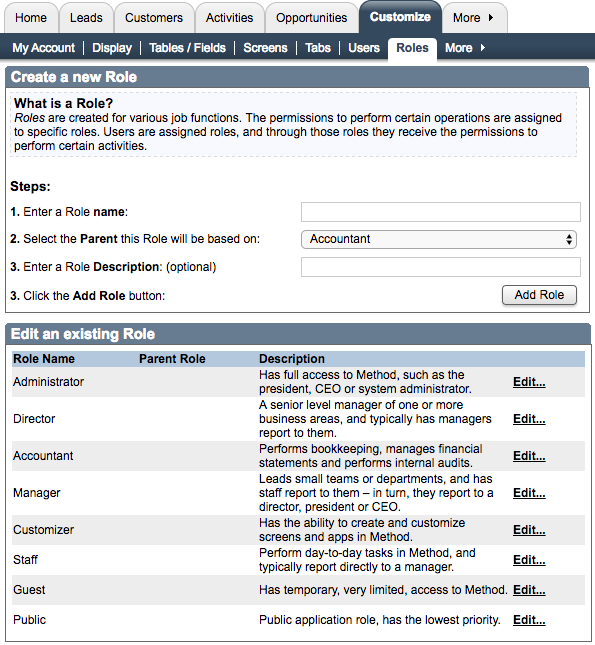
- Click Customize > Roles. This opens the Roles screen.
- Under Create a new Role, give your custom role a name.
- Select a Parent role for your custom role.
Assigning a parent to your custom role means it is inserted into the role hierarchy at the same level as the parent (e.g. a role with the parent Director would take precedent over the assigned role Staff). This is typically used to group multiple roles under a parent for improved organization of teams.
- Enter a description of this role.
Method best practice says it's a good idea to add a description so your users understand what the role entails.
- Click Add Role to save your new role. You can now assign permissions to this role as described above.
The role now appears in your Roles list: 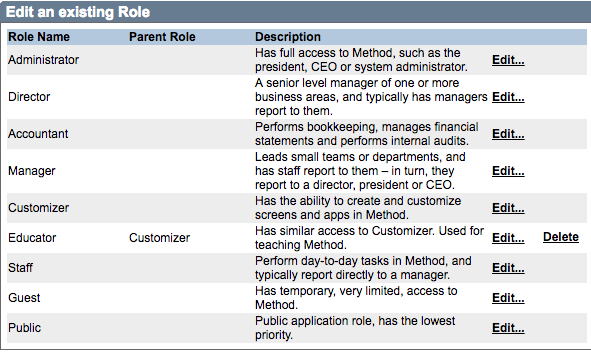
Custom roles can be deleted, but this cannot be undone.
When assigning a custom role, it can be found nested under the parent role:
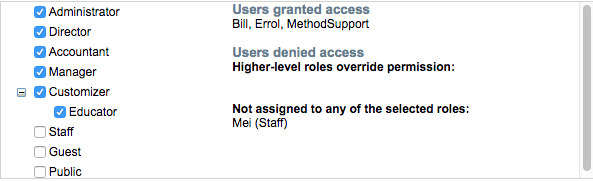
The custom role can be assigned independently of the parent role. This is typically used where the permissions assigned to the custom role differ from the permissions assigned to the parent. Both roles retain their position in role hierarchy.
[top]
| Created on | Feb-25-2016 |
| Last modified by | Caleb J. on | Mar-01-2021 |