Web to lead forms
Solution No. 83
Web to lead is a unique function in a CRM that allows potential customers (or leads) to give you their contact information by way of a web form so your staff can follow up with them. With Method, you can create a web form that automatically saves the lead and creates an opportunity and a follow-up, so no potential business is missed.
The following steps will show you how to create a basicweb to lead form in Method.
Create a basic web form[top]
- Click Customize > Integration Tools and scroll down to the Web Forms section.
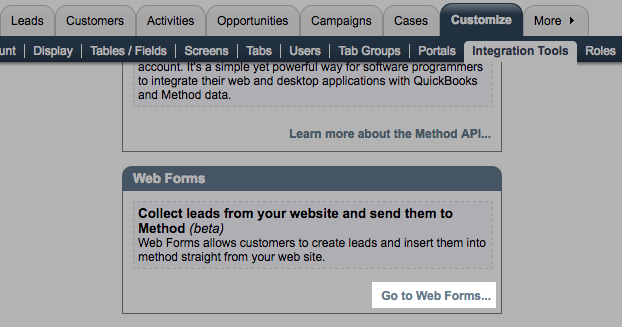
- Click Go to Web Forms.... This opens the Web to Lead Wizard.
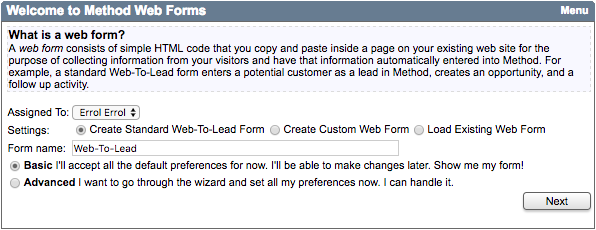
- Assign the web form to a Method user (by default it's the user signed in).
- Choose Create Standard Web-To-Lead Form (this is chosen by default).
The standard form meets the needs of most basic web-to-lead forms as described above. Custom forms allow you to do more, but require more extensive knowledge of how Method tables work, and so aren't recommended for new users. Load existing forms is empty until you have existing forms to load!
- Give the form a unique name (you cannot save more than one form with the same name).
- Choose the Basic option, then click Next.
The Basic option accepts Method's web-to-lead defaults and skips you from Step 1 to Step 9. The Advanced option walks you through the other seven steps, which we address in the next section.
- Enter the root web site address where you intend to post your form and click Add. Then click Next.
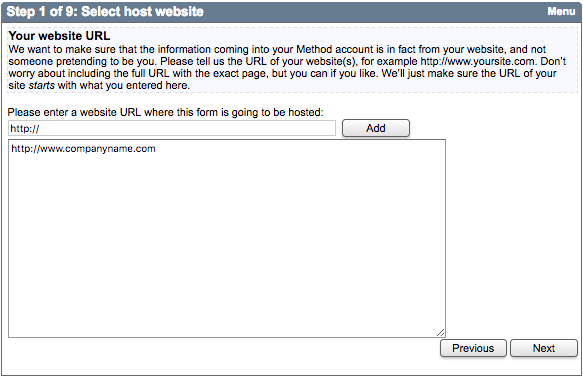
For example, if you plan to posting your form as "http://www.companyname.com/forms/contactus.html", enter "http://www.companyname.com". This is so we can perform a security check each time your form is used, to ensure it's coming from your site.
- You'll now see a sample of what your form looks like. Note the asterisks indicating required fields that Method has assigned by default.
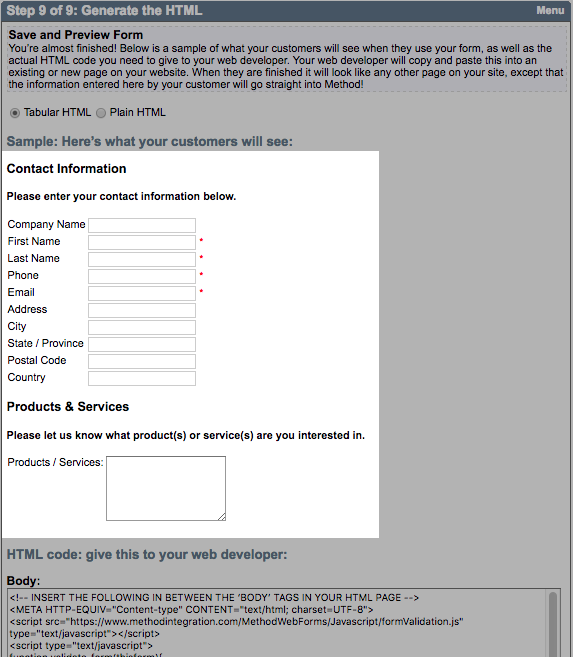
You can also see the HTML code you or your web developer can use to add this form to your website. 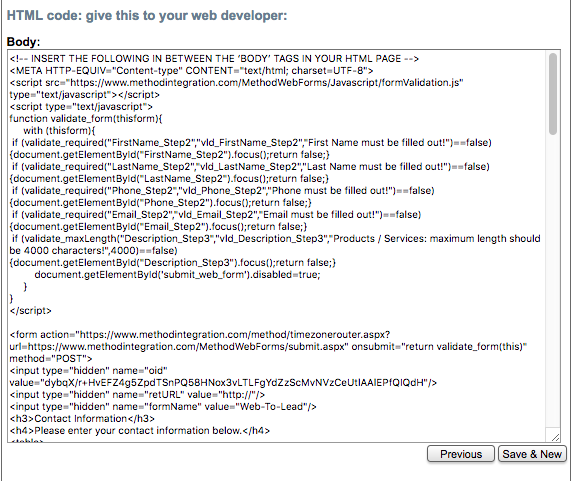
Click Save & New. The HTML is now ready for your website.
This form is now visible in the wizard under Load existing in step 3.
- Once the form has been added to your site, test it by filling in the required fields and submitting the form.
- Then, in Method, click Leads > Leads and Contacts List and select the lead you inputted.
- Scroll down to the Activities and Opportunities subtabs to ensure the opportunity and follow-up activity have been created.
You or your web developer can style the form any way you want once it is on your site, but we cannot provide technical support on your form after the code has been altered.
Create a custom web form[top]
Method offers more advanced options for users who want to add functionality to the basic web form. The following steps will walk you through how to create a custom web to lead form.
- Follow steps 1-5 above.
- On step 6, choose Advanced, then click Next.
- Enter the root web site address where you intend to post your form and click Add. Then click Next.
- Step 2 lets you identify the information you want to collect from your leads. Several fields are already chosen for you (e.g. phone number), but you can add and remove fields from the Selected list using the left and right arrow buttons.
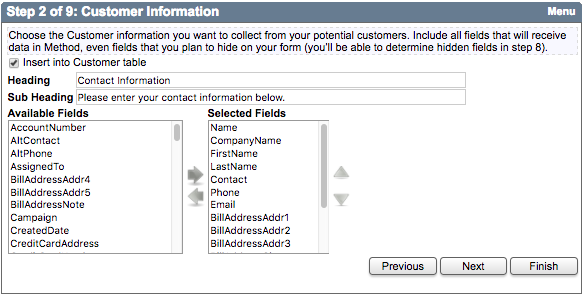
All fields can be used to receive data in Method, even those you choose to hide on the web form (which you will set up in step 8).
- Step 3 identifies the information you want to collect for the sales opportunity Method automatically creates when your lead submits their information. This information populates the opportunity when it is created. Once again, choose the fields you want to include using the left and right arrows.
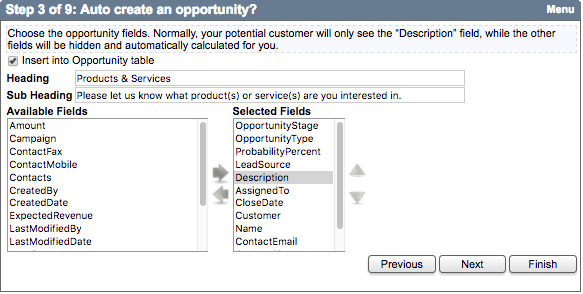
It's a Method best practice to keep the Description field visible so your lead can tell you exactly what they're interested in, in their own words.
- Step 4 identifies the information you want to collect for the activity that is created to record the date and time your lead submitted their information. This information populates the activity when it is created. This step works the same as the previous two.

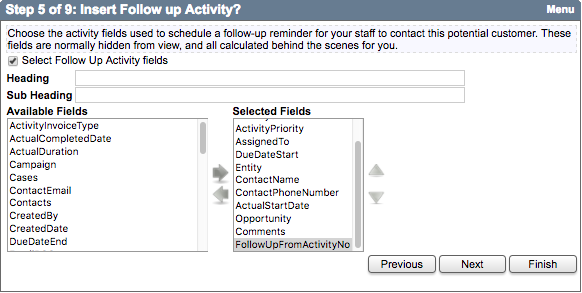
- Step 5 identifies the information you want to collect for the follow-up activity that is created to remind your staff to reach out to this lead. This information populates the activity when it is created. This step works the same as the previous three.
- Step 6 determines where your lead is redirected after they submit the form. Often, companies choose to create a "thank-you" page on their own websites. Fill in the URL of such a page here, if applicable. You can also choose to create and format a confirmation email that is sent to the lead when they submit. You can use mail mergein the body.
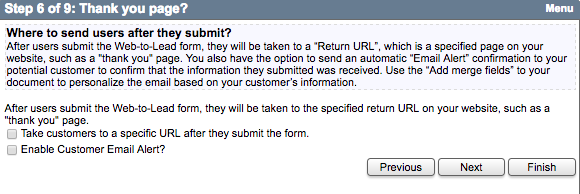
The default Email To field is populated by Email_Step2, which refers to the lead's email address Method collects from the web form when it is submitted. If you did not choose Email as a selected field in Step 2 of the wizard, the email will fail.
- Step 7 allows you to set up an internal email that is sent to you and/or your staff to notify you when a lead has submitted their information. Specify the email addresses this email will be sent to (yours and/or your staff's). You can also have Method send you an email with what details it collected if the submission fails for some reason.
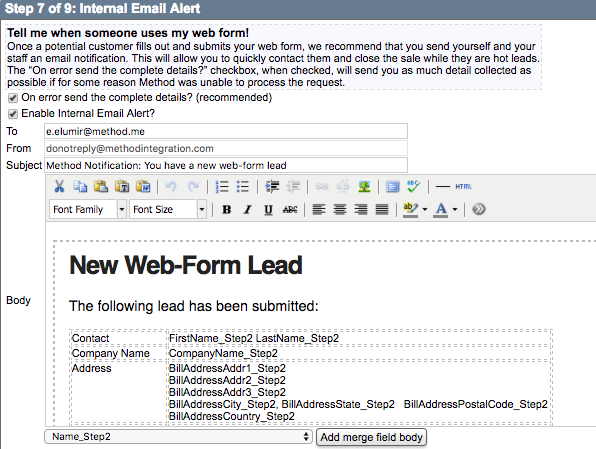
Method provides a template for this email, which you can edit in the body.
- Step 8 allows you to determine which of the fields you're using on your web form are required, which are hidden, and how they will appear (e.g. title the field CompanyName "Name of your company").
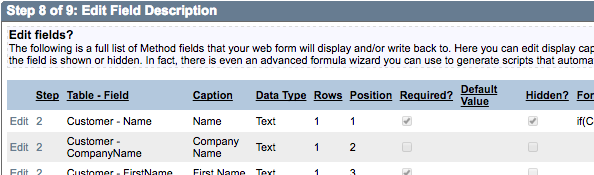
There is also an advanced wizard you can use to adjust the formula used to manipulate how the data is entered into Method, but this requires more technical knowledge, so you may want to contact a
Business Solutions Specialist.
- When you are finished with step 8, click Finish. This directs you to step 9, which shows you a sample of your form and the HTML code as it did with the basic web form.
- If you are satisfied with the form, click Save & New.
- Apply the form to your website and test it (please see steps 9-11 in Create a basic web form).
And you're done! You've successfully created your advanced web form!
[top]
| Created on | Sep-28-2011 |
| Last modified by | Caleb J. on | Oct-31-2016 |